CICD using Jenkins, Sonarqube, Gradle, Nexus , Multi- Stage- Docker File and Helm
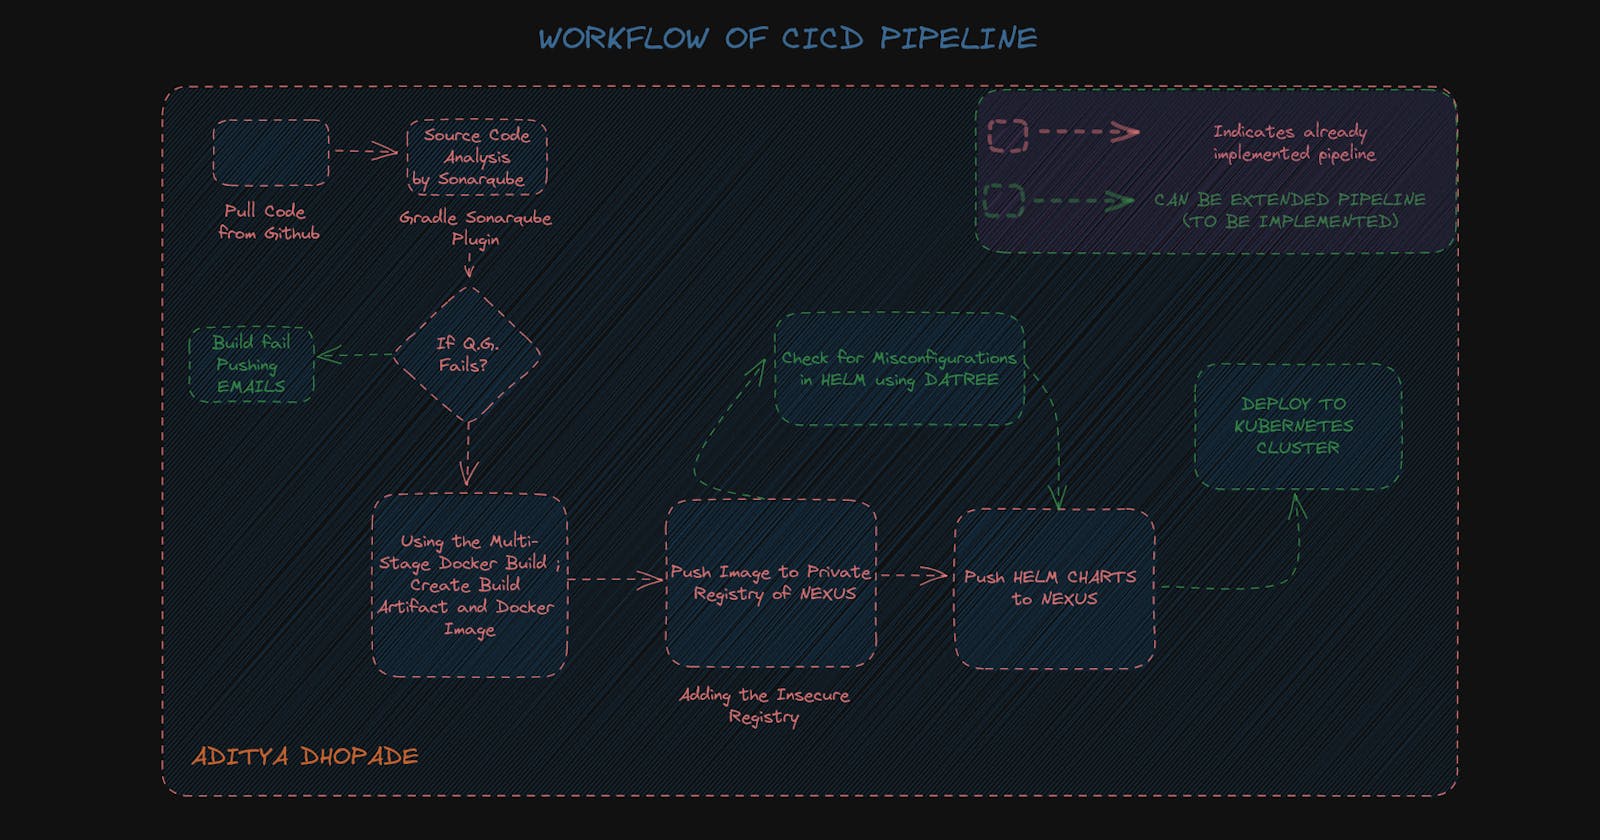
Implement CICD Pipeline using Jenkins, Sonarqube, Gradle, Nexus Multi Stage Docker File and Helm with future extension scope for the pipeline.


Sometimes it feels pretty overwhelming while building out the whole CICD pipeline in one shot but trust me it's going to get better with the more pipelines you build; the easier it will become to run the next pipelines.
You gotta be that "smooth operator" !!
I have your back on this journey of building CICD pipelines
But I suppose there are some prerequisites which are needed to follow along. I will list that for you
AWS account with the admin or equivalent access.
Setup ec2 instances for the Jenkins, nexus, sonarqube
Instances should be Ubuntu 20.04 , t2.medium, 15GB volume attached to each(for smoothness)
Allow HTTP, and HTTPS Traffic, also add the inbound rules for PORT for Instances like
For Jenkins instance = 8080
For Nexus Instance = 8081,8083
For Sonarqube Instance = 9000
In each of the instances, you can run these commands to change the hostname for better identification of the instances.
hostnamectl set-hostname <your-desired-name>
Lets start Setting up the Jenkins Instance
Start with Installing the Java for Jenkins
sudo apt update
sudo apt install openjdk-11-jdk -y
java --version
curl -fsSL https://pkg.jenkins.io/debian-stable/jenkins.io-2023.key | sudo tee \
  /usr/share/keyrings/jenkins-keyring.asc > /dev/null
echo deb [signed-by=/usr/share/keyrings/jenkins-keyring.asc] \
  https://pkg.jenkins.io/debian-stable binary/ | sudo tee \
  /etc/apt/sources.list.d/jenkins.list > /dev/null
sudo apt update -y

sudo apt install jenkins -y
sudo systemctl start jenkins && sudo systemctl enable jenkins
sudo systemctl status jenkins
Checkout the Jenkins instances running on the
<PUBLICIP ADDRESS OF JENKINS>:8080

sudo cat /var/lib/jenkins/secrets/initialAdminPassword

Install Jenkins

Setup any admin user with your credentials
Now just switch to the context to the sonarqube instance
We can setup the sonarqube installing the Posgre DB but that will consume more time and heavy setup on instances; so we can move forward with the contenarisation i.e. with the help of Docker
Install Docker
sudo apt update
sudo apt install apt-transport-https ca-certificates curl software-properties-common
curl -fsSL https://download.docker.com/linux/ubuntu/gpg | sudo gpg --dearmor -o /usr/share/keyrings/docker-archive-keyring.gpg
echo "deb [arch=$(dpkg --print-architecture) signed-by=/usr/share/keyrings/docker-archive-keyring.gpg] https://download.docker.com/linux/ubuntu $(lsb_release -cs) stable" | sudo tee /etc/apt/sources.list.d/docker.list > /dev/null
sudo apt update
apt-cache policy docker-ce
sudo apt install docker-ce
sudo systemctl status docker
sudo usermod -aG docker $USER && newgrp docker
Now as our docker is installed now so we should move towards the running of sonarqube installation
docker run -d --name sonarqube -p 9000:9000 sonarqube
Create a Token in Sonarqube
by going to the Administration --> Security --> Users --> Tokens
Create a token and save the token in Notepad
squ_<Token_hash_value>
Create a webhook in Sonarqube
Administration > Configuration > Webhooks.
In URL ==> Add <PUBLIC_IP_JENKINS>:8080/sonarqube-webhook/
Now switching again to the Jenkins Instance
In Jenkins install plugins like docker, sonarqube and Sonar quality gate plugin (manage Jenkins --> manage plugins --> in available tab search for respective plugins) After the sonar plugin installation in configure system enter sonar information as shown in the below picture
Name: any meaningful name, but this will be referred in the pipeline while executing sonar steps
Server URL: sonarqube url
Sever authentication token: this token has to be created in Sonarqube To create that token in sonarqube navigate to administration --> Security --> Users ( after which you will see list of users)
CLONE THE REPOSITORY BELOW for getting SourceCode of the Demo
MULTI-STAGE DOCKER FILE:
Let us create a Docker File in the local folder of ours for deploying our code (.Dockerfile)
# this is multi stage docker file here
FROM openjdk:11 as base
WORKDIR /app
COPY . .
RUN chmod +x gradlew
RUN ./gradlew build

FROM tomcat:9
WORKDIR webapps
COPY --from=base /app/build/libs/sampleWeb-0.0.1-SNAPSHOT.war .
RUN rm -rf ROOT && mv sampleWeb-0.0.1-SNAPSHOT.war ROOT.war

-------------------COPY TILL HERE ------------------
We would be using here the Multistage Docker File i.e. would run our JavaImage and host it on the Apache Tomcat Image

FROM openjdk:11 as base ==> taking base image as openjdk:11 and adding an alias to it as "base"
^^^^^^^^^^^^^^^^^^^^^^^^^^^^^^^^^^^^^^^
WORKDIR /app ==> Setting working directory as /app in our container
^^^^^^^^^^^^^^^^^^^^^^^^^^^^^^^^^^^^^^^^^^^^^^^^

COPY . .  ==> Copying all the content of the local folder to the Containers current directory(/app)
^^^^^^^^^^^^^^^^^^^^^^^^^^^^^^^^^^^^^^^^^^^^^^^^^^^^^^

RUN chmod +x gradlew  ==> need to set the permission for the gradle build to execute else would throw error permission denied
^^^^^^^^^^^^^^^^^^^^^^^^^^^^^^^^^^^^^^^^^^^^^^^^^^^^^^^^^^
RUN ./gradlew build  ==> Build it uisng ./gradlew build
^^^^^^^^^^^^^^^^^^^^^^^^^^^^^^^^^^^^^^^^^^^^^^^^^^^^^^
FROM tomcat:9 ==> We take the image as tomcat9
^^^^^^^^^^^^^^^^^^^^^^^^^^^^^^^^^^^^^^^^^^^^^^
WORKDIR webapps ==> Setting up the WorkDir as webapps

^^^^^^^^^^^^^^^^^^^^^^^^^^^^^^^^^^^^^^^^^^^^^^^^^^^^^^^^^^^^^^
COPY --from=base /app/build/libs/sampleWeb-0.0.1-SNAPSHOT.war .  ==>

We are using the above Java Image as our input to Tomcat image
The Build stored under our local in the path /app/build/libs/sampleWeb-0.0.1-SNAPSHOT.war
It will be copied to the containers cureent directory
^^^^^^^^^^^^^^^^^^^^^^^^^^^^^^^^^^^^^^^^^^^^^^^^^^^^^^^^^^
RUN rm -rf ROOT && mv sampleWeb-0.0.1-SNAPSHOT.war ROOT.war

Here we are removing the exisiting ROOT Folder and  renaming our build to the
the new build name will be ==> sampleWeb-0.0.1-SNAPSHOT.war

 mv sampleWeb-0.0.1-SNAPSHOT.war ROOT.war it will help us to rename as it will copy the contents from the ROOT.war
and add it to the sampleWeb-0.0.1-SNAPSHOT.war

This war file will then be pushed in the Pipleines.
Let us move to the Nexus Instance:
In Nexus it requires Java especially Java8; as with the above versions it is not supported
#TO install nexus we need to install java first
sudo apt-get update
sudo apt-get install openjdk-8-jdk
# to install nexus only

wget https://download.sonatype.com/nexus/3/nexus-3.60.0-02-unix.tar.gz
tar -xvzf nexus-3.60.0-02-unix.tar.gz
cd nexus-3.60.0-02/bin
./nexus start
./nexus status

## ACCESS USING THE PORT 8081  => IP ADDRESS:8081
Go to the browser ==> <PUBLIC_IP_NEXUS>:8081
cat /home/ubuntu/sonatype-work/nexus3/admin.password

#Initial Password and USername
username: admin
password: admin

# IF JAVA_HOME IS NOT SET TO JAVA 8 THEN DO THE FOLLOWING STEPS

sudo alternatives --config java
nano ~/.bashrc
export JAVA_HOME="/usr/lib/jvm/java-8-openjdk-amd64" #[Append it to the bottom]
source ~/.bashrc
java -version
Now let us try to add the script into the pipeline of ours
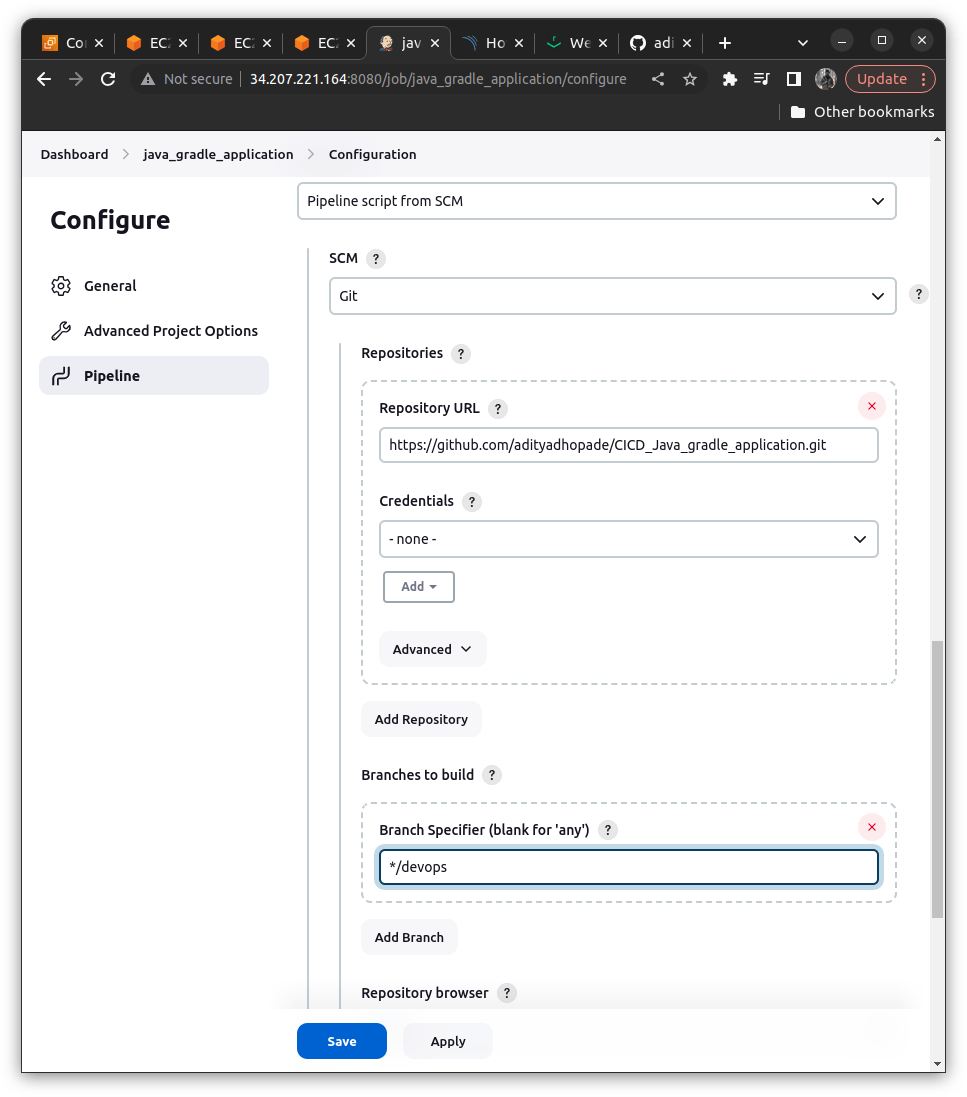
NOTE: I have created the main branch here; but we should use some other branch as it's not a good practice to push the content directly on the main branch
Create a Jenkins File(if already exists you can follow the explanation below would help you to understand why we have used such scripts); The Content of the Jenkins File will be then for our first step will be like
pipeline{
  agent any
  stages{
    stage("sonar quality check"){
      steps{
        script {

          withSonarQubeEnv(credentialsId: '20sep-sonar-token') {
            sh 'chmod +x gradlew'
            sh './gradlew sonarqube'
          }
           timeout(time: 1, unit: 'HOURS') {
             def qg = waitForQualityGate()
             if (qg.status != 'OK') {
                 error "Pipeline aborted due to quality gate failure: ${qg.status}"
             }
           }
        }
      }
    }
  }
}

------------- COPY TILL HERE ---------------------------

# The explaination for each step lies below

withSonarQubeEnv(credentialsId: '20sep-sonar-token') ==> It helps us to tell the jenkins that where sonarqube is hosted; for that we need to install the plugins (that we did above)

# we are using the build tool here as gradle; not the maven or ant; commands will be like
sh 'chmod +x gradlew' ==> We need to set the execute permissions to the gradle

sh './gradlew sonarqube' ==> It help to push against sonarqube and validate according to sonar rules

# Before running this ensure that all the installations related to Docker are in place

the  timeout(time: 1, unit: 'HOURS') {} ==> syntax represent for how much time the pipeline should wait for the Quality Gates
We can generate the above syntax with the help of Pipeline Synatx Generator in Jenkins [Avaliable in the Sidenav when Building a Pipeline]

          timeout(time: 1, unit: 'HOURS') {
             def qg = waitForQualityGate()
             if (qg.status != 'OK') {
                 error "Pipeline aborted due to quality gate failure: ${qg.status}"
             }
           }

Here qg aka Quality Gates represents the qg.status if its "OK" then move ahead or else throw a message like Pipeline aborted due to quality gate failure: ${qg.status}
We will move to the next stage by storing our build into the repository we could have used the public repositories like the DockerHub, but here we are considering the private repository Nexus; our build will be stored at the private repo of the nexus
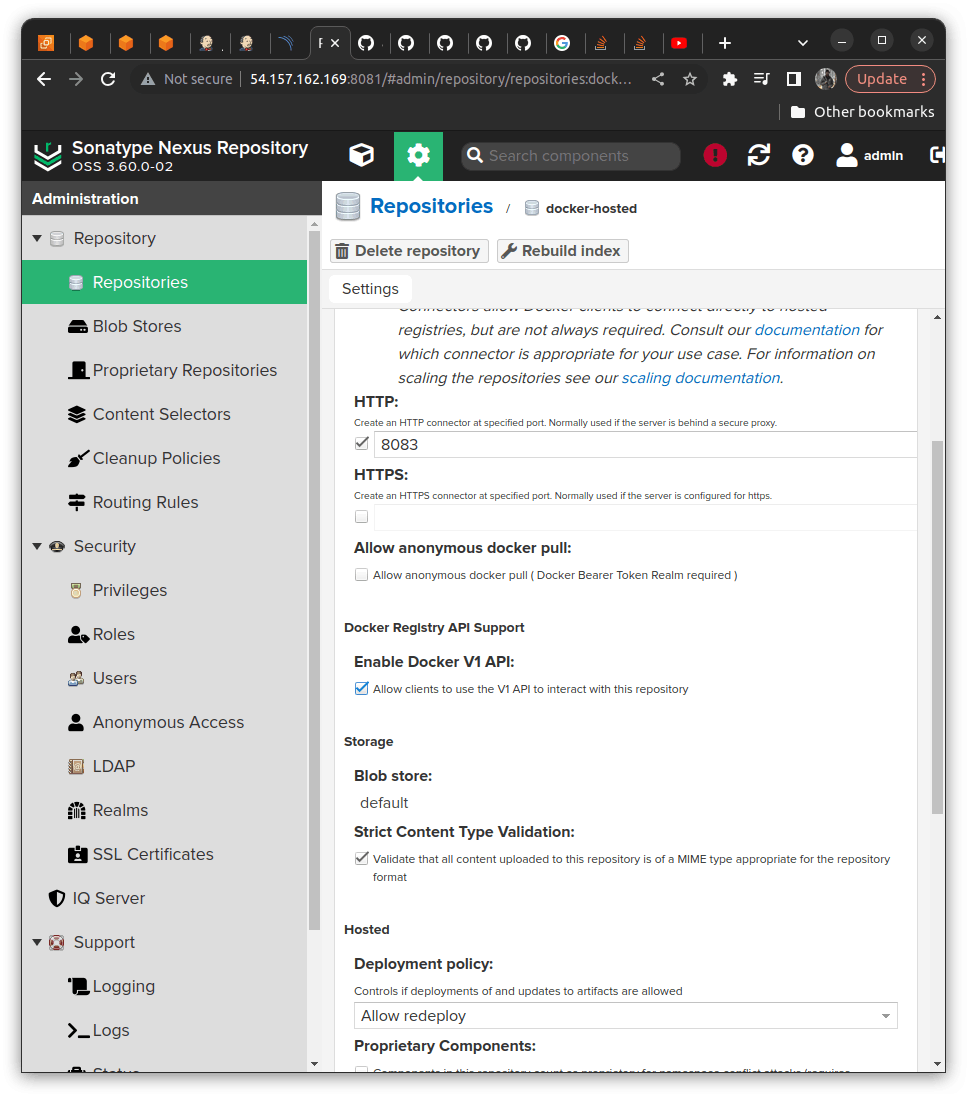
We will be creating the Repository named docker-hosted and adding port 8083 in the HTTP section Check the Enabling Docker V1 API and create a repository.
In Nexus click on the gear button --> click on repositories --> click on create repository

Once this nexus repository is set up then we need to go to the terminal console of the nexus
We here need to set an insecure registry
What is the need for an insecure registry why not go for the secured registry?
Nexus 3 requires authentication from users to publish docker images; while the docker daemon enforces to use of the registry connection to use HTTPS.
By default NEXUS REPOSITORY is not configured with the HTTPS connectors; and for that, we require SSL Certificates and set it manually
To have a workaround the Docker Daemon considers Nexus HTTPS as untrustworthy, so the daemon has an option called insecure-registry.
The intent is to avoid errors that would normally occur when using an untrusted certificate.
We can workaround like the following
GO to the directory in the Nexus Terminal

If this file doesnt exist then we should make one in this location with the following content

cd  /etc/docker/daemon.json

{ "insecure-registries":["nexus_machine_public_ip:8083"] }
Then we need to restart the docker so that we can apply the changes done in the JSON file should get reflected in that
systemctl restart docker
Then verify using the command that the insecure registries include your port as a whole
docker info

# This should be visible

nexus_machine_public_ip:8083
Once this setup is done we can verify the connectivity by using the following like
docker login -u nexus_username -p nexus_pass nexus_public_ip:8083

# It should giveout connection established

# This username and password will be the ones taht we have setted while installing the nexus repository

nexus_username ==> Your nexus username
nexus_password ==> Your nexus password

But adding the credentials for the nexus passowrd doesnt seem valid so we will work upon it below
pipeline{
  agent any
  environment{
    VERSION = "${env.BUILD_ID}"
  }
  stages{
    stage("sonar quality check"){
      steps{
        script {
          withSonarQubeEnv(credentialsId: '20sep-sonar-token') {
            sh 'chmod +x gradlew'
            sh './gradlew sonarqube'
          }
           timeout(time: 1, unit: 'HOURS') {
             def qg = waitForQualityGate()
             if (qg.status != 'OK') {
                 error "Pipeline aborted due to quality gate failure: ${qg.status}"
             }
           }
        }
      }
    }

    stage("Docker Build"){
      steps{
        script{
          withCredentials([string(credentialsId: 'docker_pass', variable: 'docker_password')]) {
          sh '''
            docker build -t 34.234.193.66:8083/spring-app:${VERSION} .
            docker login -u admin -p $docker_password 34.234.193.66:8083
            docker push 34.234.193.66:8083/spring-app:${VERSION}
            docker rmi 34.234.193.66:8083/spring-app:${VERSION}
          '''
          }
        }
      }
    }
  }
}
-------------------------COPY TILL HERE-----------------------

withCredentials([string(credentialsId: 'docker_pass', variable: 'docker_password')]) ==> this syntax is generated with the pipeline syntax "withCredentails"

docker_pass actually contains the password for the login credntial of the nexus password(that we have setted during installing the nexus)

1 docker build -t 34.234.193.66:8083/spring-app:${VERSION} .

We are tagging it with the version and build will be stored under the spring-app folder
As we are running a pipeline and to diffrentiate betwwen each build we can diffrentiate using the ${VERSION}

${VERSION} is an env variable which contains the BUILD_ID which is actually contains the Build number which we currently are running
We have also added it to the top of the pipeline like

  environment{
    VERSION = "${env.BUILD_ID}"
  }
--------------------------------------------------------
2 docker login -u admin -p $docker_password 34.234.193.66:8083

We are logging into the nexus repository with the credentails taht we have passed on <PUBLIC_IP_NEXUS>:8083
username = admin
password = $docker_password
----------------------------------------------------------------
3 docker push 34.234.193.66:8083/spring-app:${VERSION}

Here we are pushing our build with the specific build_id which is stored under the version number
under the spring app folder

----------------------------------------------------------------
4 docker rmi 34.234.193.66:8083/spring-app:${VERSION}

As we have limited storage in the container and we do not want to store the image
As it will occupy much more spaces so we just remove it using docker rmi <Recent-Build-Image>
Now in the Next step, we will be pushing the Helm Hosted Repository to the Nexus Repository and Pushing the Helm Charts
Installing Helm on Jenkins machine
curl -fsSL -o get_helm.sh https://raw.githubusercontent.com/helm/helm/main/scripts/get-helm-3
chmod 700 get_helm.sh
./get_helm.sh
So for setting up the Helm Repository, we need to do the following
In Nexus click on the gear button --> click on repositories --> click on create repository
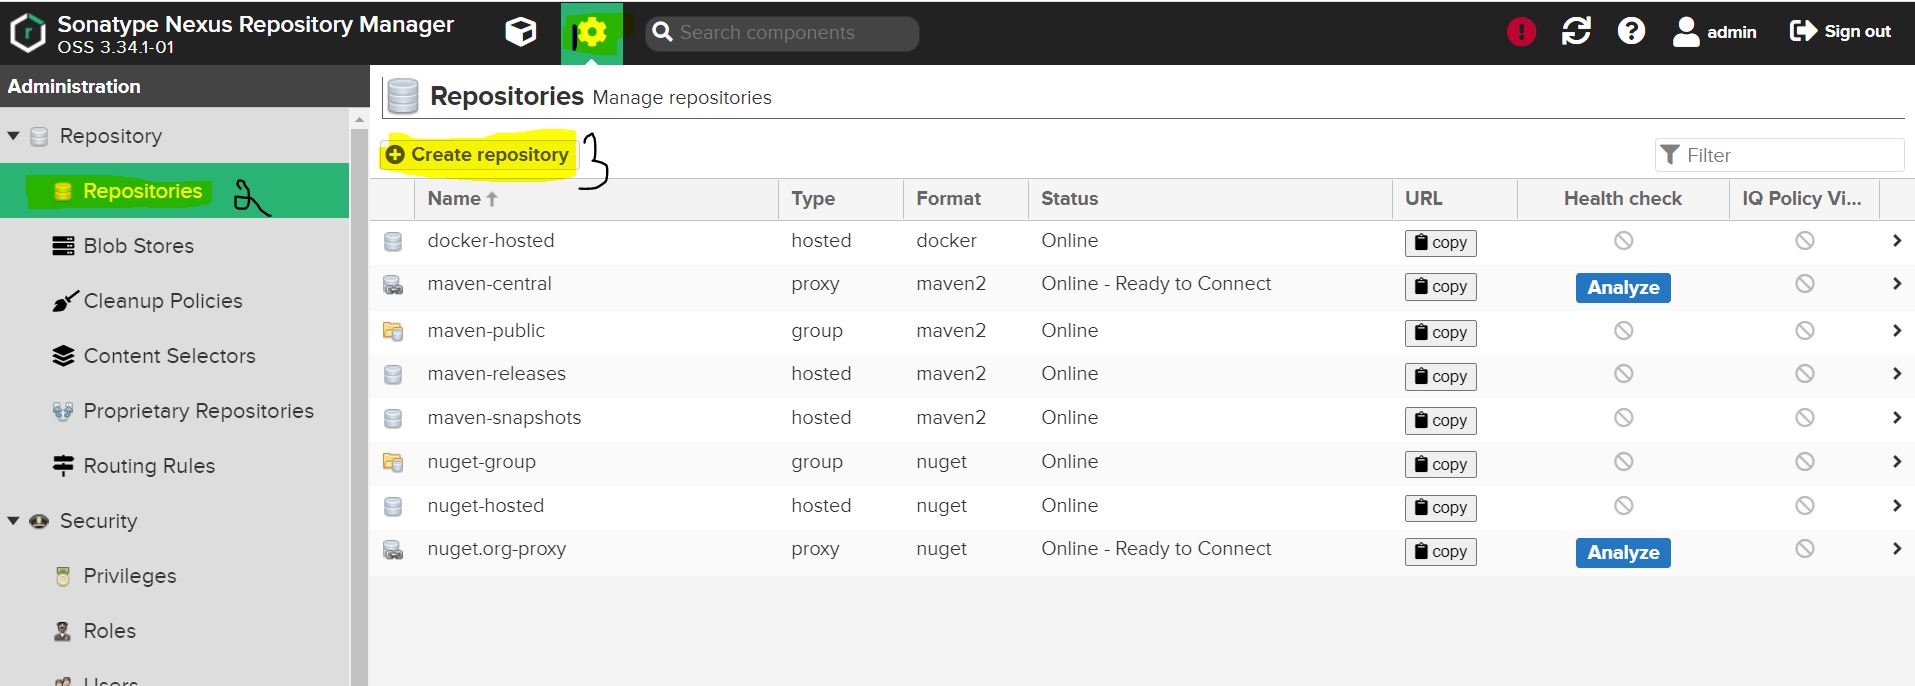
type as helm-hosted ==> name it as helm-hosted
Now no other configuration is needed in Jenkins host because we will nexus repo api and publish the helm charts
For pushing the helm charts we will need a command like
curl -u admin:$nexus_password http://nexus_machine_ip:8081/repository/helm-hosted/ --upload-file myapp-${helmversion}.tgz -v
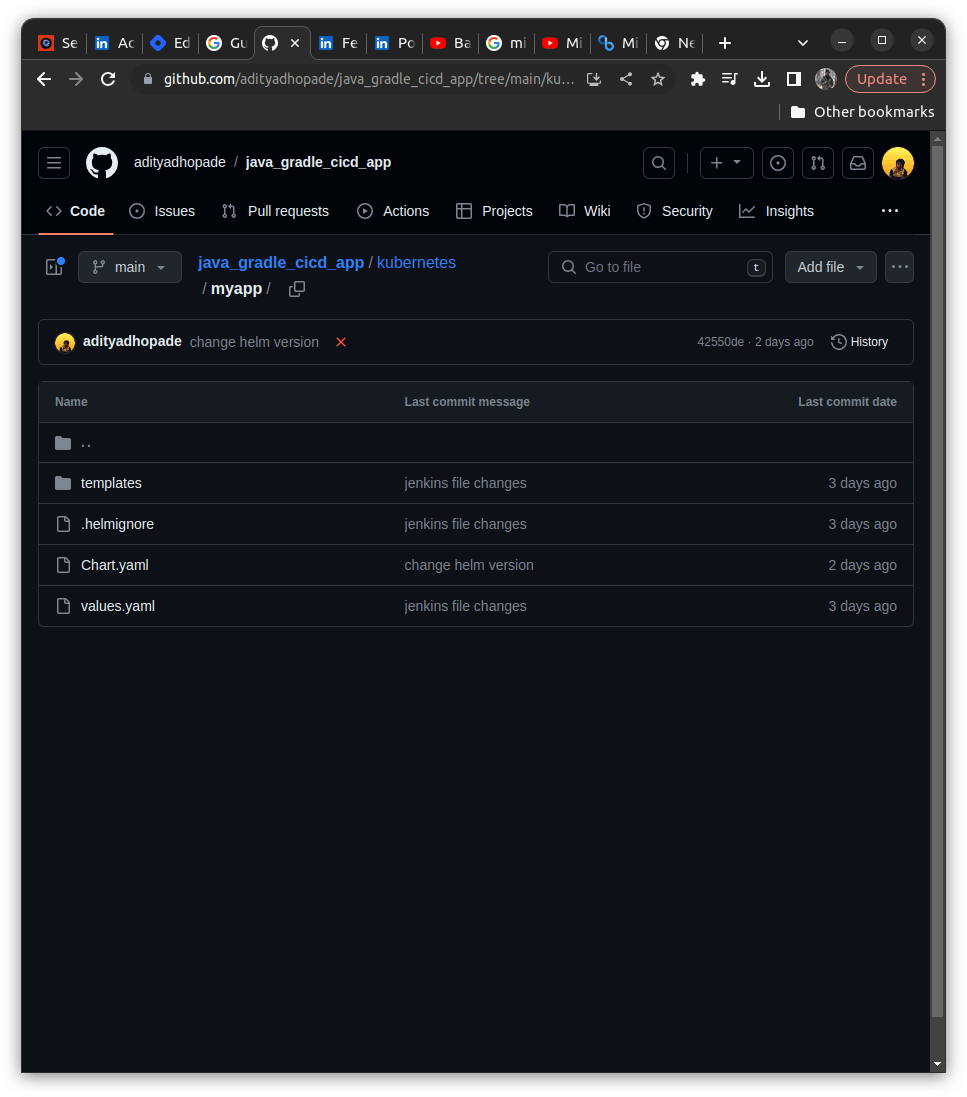
In my repository ==> under the Kubernetes folders I have added the following scripts under kubernetes/myapp/ folder it consist of Charts, values.yaml.
pipeline{
  agent any
  environment{
    VERSION = "${env.BUILD_ID}"
  }
  stages{
    stage("sonar quality check"){
      steps{
        script {
          withSonarQubeEnv(credentialsId: '20sep-sonar-token') {
            sh 'chmod +x gradlew'
            sh './gradlew sonarqube'
          }
           timeout(time: 1, unit: 'HOURS') {
             def qg = waitForQualityGate()
             if (qg.status != 'OK') {
                 error "Pipeline aborted due to quality gate failure: ${qg.status}"
            }
          }
        }
      }
    }

    stage("Docker Build"){
      steps{
        script{
          withCredentials([string(credentialsId: 'docker_pass', variable: 'docker_password')]) {
          sh '''
            docker build -t 34.234.193.66:8083/spring-app:${VERSION} .
            docker login -u admin -p $docker_password 34.234.193.66:8083
            docker push 34.234.193.66:8083/spring-app:${VERSION}
            docker rmi 34.234.193.66:8083/spring-app:${VERSION}
          '''
          }
        }
      }
    }

    stage("Pushing Helm Charts to Nexus"){
      steps{
        script{
          withCredentials([string(credentialsId: 'docker_pass', variable: 'docker_password')]) {
            dir('kubernetes/') {
              sh '''
                helmversion=$(helm show chart myapp | grep version | cut -d: -f 2 | tr -d ' ')
                tar -czvf myapp-${helm-version}.tgz myapp/
                curl -u admin:$docker_password http://34.234.193.66:8081/repository/helm-hosted/ --upload-file myapp-${helmversion}.tgz -v
              '''
            }
          }
        }
      }
    }
  }
}

---------------------- COPY TILL HERE ---------------------------

We need to understand what we need to do here is that we want to push our Helm Repo to the Nexus Repository

 curl -u admin:$docker_password http://34.234.193.66:8081/repository/helm-hosted/ --upload-file myapp-${helmversion}.tgz -v

We are passing our nexus username:password and psuhing onto the http://<PUBLIC_IP_NEXUS>:8081/repository/helm-hosted/

We want to upload the build generated by the helm in the zipped format

--upload-file myapp-${helmversion}.tgz -v

${helmversion} is for identifying different build number in the pipeline
------------------------------------------------------------------

We get the helm version here with the help of this command

helmversion=$(helm show chart myapp | grep version | cut -d: -f 2 | tr -d ' ')

helm show chart myapp ==> gives out the JSOn of our Helm Charts buiild like

apiVersion: v2
appVersion: 1.16.0
description: A Helm chart for Kubernetes
name: myapp
type: application
version: 0.2.0

We need to extarct the version from it (For identifying each build uniquely)

grep version ==> it will fetch our field version: 0.2.0

cut -d: -f 2  ==> It will start cutting from the delimeter ":" and the field(f) as 2 so we get " 0.2.0" part of the [version: 0.2.0]

tr -d ' ' ==> It will trucate the delimeter " " and will fecth usproepr version 0.2.0 as such

Also what we are expecting here is that we get the myapp-${helm-version}.tgz [archived file] so we firstly need to create one we get it done using the following like

tar -xvcf myapp-${helm-version}.tgz myapp/ ==> We are here preparing to archieve or bundle or zip file it to .tgz and store it into the myapp/ folder

 and it needs to be done in the kubernetes folder itself so we are using it like as follows

 dir('kubernetes/') {   ==> Generated with the help of the Pipeline Syntax generator ==> Directory
     // All sh commands
 }
I hope you get some worthy content from the above demo. It requires lots of time and effort to prepare this CICD Demo to make it work I am sure this will workout for you even if it doesn't we can debug the Jenkins pipeline; also it enhances our troubleshooting skills which turns out should be the capability of the DevOps Engineer.
If you want to take the pipeline forward (I recommend you to go that way.) we can take it by implementing it further like
Adding the mailing Capability as soon as the build is passed or failed should trigger the mail to the owner about the pipeline status
We can identify various HELM misconfigurations with the help of Datree.
Can identify various checks of dependencies if they are properly installed or not with the help of OWASP DEPENDENCY CHECK
Deploying it to the Kubernetes using the Kubeadm for provisioning the multi-node cluster setup.
We can add the SMTP configuration in the Jenkins in the post-block which will be parallel to the stages block
pipeline {
    agent any
    stages {
        stage('Example') {
            steps {
                echo 'Hello World'
            }
        }
    }
    post {
        always {
            echo 'I will always say Hello again!'
        }
    }
}
We can identify various HELM misconfigurations with the help of Datree. Datree has some inbuilt policies which can be modified by the users to implement them further according to our needs, also it provides detailed reports on the HELM misconfigurations.