Deploy Full Stack Application using CICD Pipeline
Deploy Full Stack Application using Kubernetes, Docker, Jenkins, SonarQube, Maven, Nexus


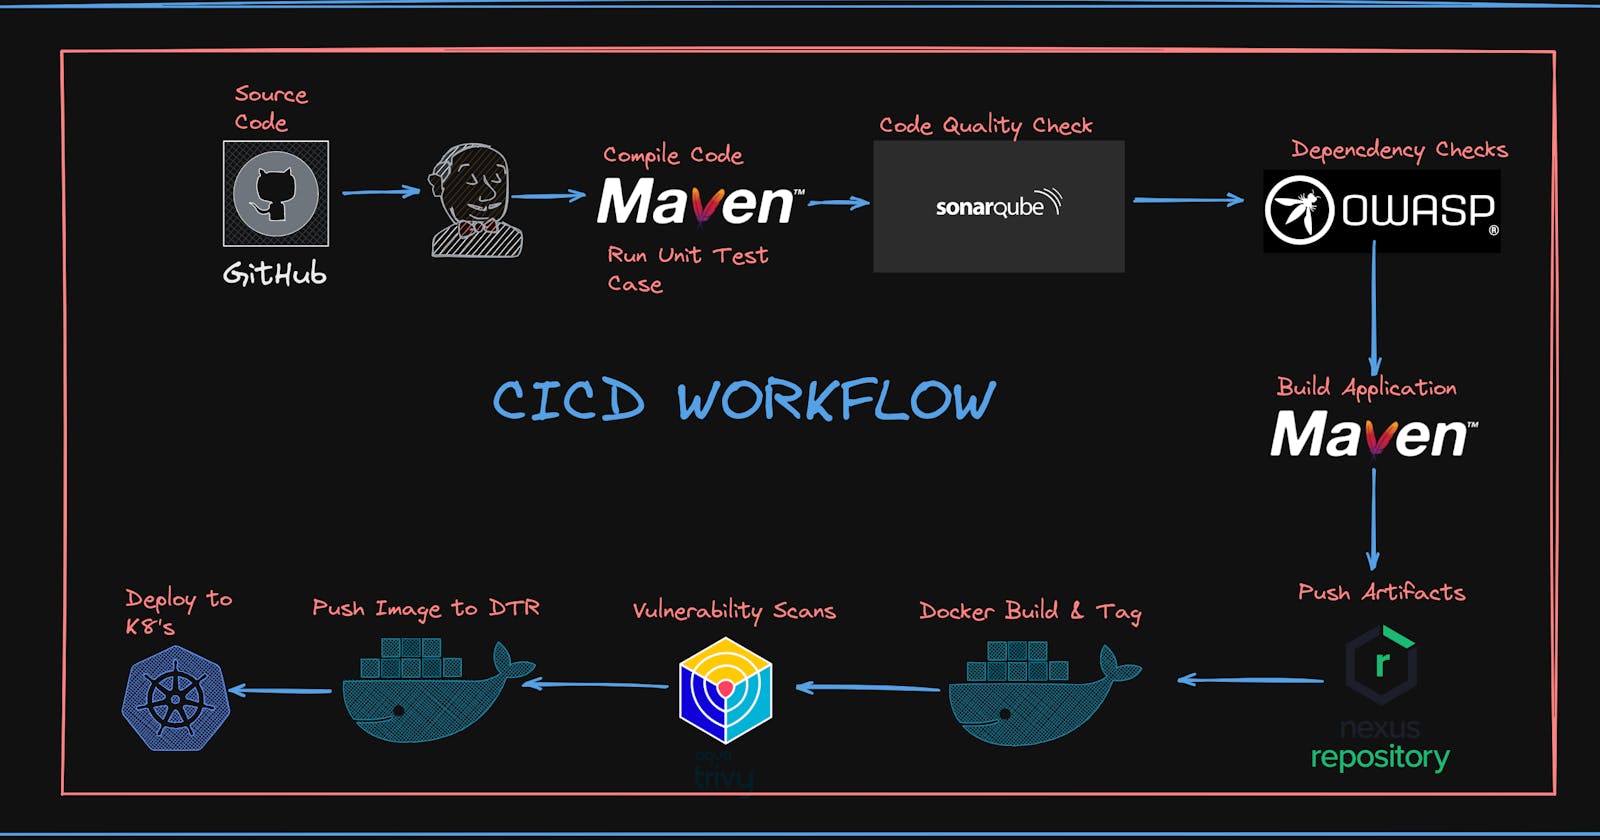
WORKFLOW OF THE APPLICATION

🌟 Key Moments 🌟
- Configuring POM.xml
- Setting up "Managed Files" => For Global Maven Settings
- Setting Up Pipelines
- Configuring the Control Plane and Data Plane Nodes in Kubernetes
- Deploying to Kubernetes
Prerequisites:
Basic knowledge of Kubernetes, Jenkins, and AWS Account
[MUST] Clone the Repository [For getting the Application Code]
Setting up the Instances and Security Group
Create individual machines for the Jenkins, Nexus, and Sonarqube [Setting 1 machine for each tool used]
Machine Details: t2 medium; 20 GB Storage; Ubuntu 20.04
For Security Groups [Add the following groups]
SMTP TCP 25
Custom TCP - TCP Range from 30000 to 32767 // For Kubernetes NodePOrt Service
Custom TCP - TCP Range from 3000 to 10000 // Maximum Installations of Tools under these Ranges
HTTP - TCP - 80
HTTPS - TCP - 443
SSH TCP 22
CUSTOM TCP 6443 //  the Kubernetes API server listens on port 6443 on the first non-localhost network interface, protected by TLS
Setting the Jenkins, Nexus, and SonarQube from the same instance; increase the increase count from 1 to 3
Jenkins Server Setup: [JENKINS SERVER]
Dashboard Login
# Default Credentials
name: admin
password: cat <Path given in dialog box>

# Setting up the new cedentials
username: admin
password: admin@123
Install Java 17;
sudo apt-get update

# Install JAva17[As java 11 support will get deprecated in Jenkins Dashboard]
sudo apt install openjdk-17-jre-headless

# INstall Jenkins on Ubuntu
sudo wget -O /usr/share/keyrings/jenkins-keyring.asc \
  https://pkg.jenkins.io/debian-stable/jenkins.io-2023.key
echo deb [signed-by=/usr/share/keyrings/jenkins-keyring.asc] \
  https://pkg.jenkins.io/debian-stable binary/ | sudo tee \
  /etc/apt/sources.list.d/jenkins.list > /dev/null
sudo apt-get update
sudo apt-get install jenkins
sudo systemctl enable jenkins
sudo systemctl start jenkins
sudo systemctl status jenkins

# Access the jenkins Dashboard from the
<IP of Jenkins VM>:8080
Install Docker
sudo apt  install docker.io
sudo chmod 666 /var/run/docker.sock [Not secured approach; better method is to changing the specific permissions ofjenkins and ubuntu user.]
Install Plugins in Jenkins [JENKINS SERVER]
- Sonar => sonarQube scanner
- Maven => pipeline maven integration plugin
- Nexus => nexus artifact uploader, config file provider
- Docker => docker, dockerpipeline, docker-build-step, cloudbess docker build and publish
- Owasp => owasp dependency check
- For jdk [it helps to install multiple jdk version whichever we want to install in pipeline] => eclipse temurin installer
- Kubernetes => kubernetes, kubernetes CLI
Configure Tools [JENKINS SERVER]
# Configure JDK
Install JDK from Adoptium; Set version above jdk17.3.4 => name: jdk17
# Incase if app doesent work withJDK17 ; Install jdk11 also
Install JDK from Adoptium; Set version above jdk11.3.4 => jdk: jdk11
#Sonar Scanner Instalations
name:sonar-scanner; With latest versions

#Maven Installations
name:maven3; with version above from maven 3.6.3

# Dependency Check Installation
name: DC; install automatically => version 6.5.1

#Docker Installations
name:docker; From docker.com => install auto => Latest version
Connect Jenkins To SonarQube [JENKINS SERVER]
- Generate the Token (sonar-token) in the SonarQube Dashboard; [Covered in Sonar Installation]
- Add it as a Global Credential; with secretText

# Generate Token with the fields setted as
name: sonar-token
description: sonar-token
secret_text: <YOUR GENRRATED TOKEN>
Configure Jenkins to Dockerhub [JENKINS SERVER]
- Add the Credentials into the Global Credentails; username with password;
username: <your dockerhub username>
password: <your dockerhub password> or <token generated from dockerhub>
Configure the NEXUS REPOSITORY [NEXUS SERVER]
Install Docker [As we will run the Nexus as a Docker Container]
# Install Docker [Copy from Above Commands]
docker run -d -p 8081:8081 sonatype/nexus3

# To login to the NEXUS DB we need username and password;
# To get the password
docker exec -it <ID_of_NEXUS_CONTAINER> bash

# the password is stored at the location
cd sonatype-work/nexus3
cat admin.password

# set new password as per your liking as we will need it further
new username: admin
new password: your new password
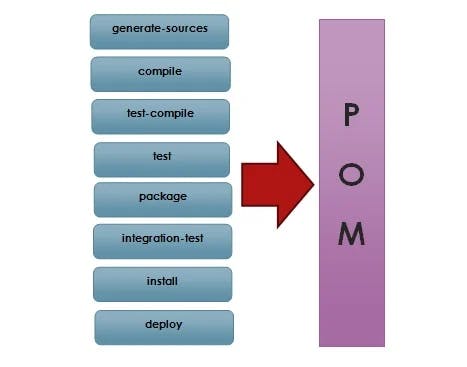
We are going to use the "maven-release" and "maven-snapshot" repositories; when pushing the repos we generally push our builds in the "maven-snapshot" but only when we want to release it to the production we have set the repository to the "maven-release". These repositories are set in the POM Files; POM files contain the dependency of the projects;
Connect Jenkins to Nexus [JENKINS SERVER]
Access the Nexus Dashboard
<IP of NEXUS Server>:8081
# enter the credentials
username: admin
password: it is stored in the sonatype-work/nexus3 [as seens above]
We must add a new plugin for connecting the Nexus to the Jenkins Dashboard; known as "managed files"
It will show us the managed file under the path manage Jenkins => Managed Files => Add a new config file
name: global maven settings.xml

id: global-maven

content: < credentials of the nexus server>
We will be using the two repositories of the Nexus which are the "maven-release" and "maven-snapshot"
Where we will push our artifact that the Help of the POM.xml file will decide under the <versions></versions> it can either be 0.0.1-SNAPSHOT or 0.0.1
If it's 0.0.1-SNAPSHOT: It means that the generated artifact is still in the development phases and it is not yet ready for production(release) we will store it under the maven-snapshot repository
If it's 0.0.1: It means that the artifact is ready for release; we will store it under the maven-release repository.
 #Copy this block from under the commented section and add them into the
    <server>
      <id>deploymentRepo</id>
      <username>repouser</username>
      <password>repopwd</password>
    </server>
# Alter the contents of them like
# For maven release
    <server>
      <id>maven-releases</id>
      <username><YOUR USERNAME for NEXUS></username>
      <password><YOUR PASSWORD for NEXUS></password>
    </server>
# For maven snapshots
    <server>
      <id>maven-snapshot</id>
      <username><YOUR USERNAME for NEXUS></username>
      <password><YOUR PASSWORD for NEXUS></password>
    </server>
Make changes in the POM.xml file
# In the <repository></repository>
# Add the URL for both the maven-release and maven-snapshot in the above tag

    <repository>
      <id>maven-releases</id>
      <name>maven-releases</name>
      <url><URL LINK FOR THE MAVEN RELEASE FROM NEXUS REPOSITORIES></url>
    </repository>
    <snapshotRepository>
      <id>maven-snapshots</id>
      <name>maven-snapshots</name>
      <url><URL LINK FOR THE MAVEN SNAPSHOTS FROM NEXUS REPOSITORIES></url>
    </snapshotRepository>
Configuring the SonarQube Servers [SonarQube Server]
Installing Docker [As we are going to use the SonarQube as Docker Container]
# install Docker [Fro the above steps]
# Using the sonarqube:lts-community edition which is free to use
docker run -d -p 9000:9000 sonarqube:lts-community
Accessing the Sonar Dashboard [SonarQube Server]
# Access it via the default credentails first
username: admin
password: admin

# Set the passwordas per you liking
password: your-generated-password
Connecting SonarQube to Jenkins [SonarQube Server]
Create the Token => Add the Token into the Jenkins Global Credentials
# Token Details should look like
name: jenkins-token
token_generated: squ_<hash_values>
Setting Pipelines [Jenkins Server]
Foundation of the Pipeline
Job Type : Pipeline Syntax
Name of Job: full-stack

# mark features
Discard Old Builds
No. of Builds to Keep: 2
Days to keep Build: 100 Days

# NOTE
No pipeline stage names should be the same.
A> Stage 1: Checkout
It creates the local copy of the source code in Jenkins in the Workspace.
Generate the Syntax for the pipeline using the "Pipeline Syntax";
git branch: 'main', url: 'https://github.com/adityadhopade/Ekart.git'
The Stage1 will look like
pipeline {
    agent any

    stages {
        stage('Checkout') {
            steps {
                git branch: 'main', url: 'https://github.com/adityadhopade/Ekart.git'
            }
        }
    }
B> Stage 2: Compile Source Code
As our bae project we have used is a SpringBoot Application we have made use of Maven as the Build Tool; So we will use Maven to Compile our Code
Command to compile the source code using Maven is simple mvn compile
But we should enclose within the shell commands in the Groovy pipelines;
Also as we are using Maven as a tool here then we can it in the tools {} block;
To make its version consistent across the pipeline; use it below
tools {
  toolname1 'name-given-under-tools'
  toolname2 'name-given-under-tools'
}
So it should look like
tools {
    maven 'maven3'
    jdk 'jdk17'
}


sh "mvn compile"
Stage2 will turn out as follows
pipeline {
    agent any
    tools {
        maven 'maven3'
        jdk 'jdk17'
    }

    stages {
        stage('Checkout') {
            steps {
                git branch: 'main', url: 'https://github.com/adityadhopade/Ekart.git'
            }
        }

        stage('Compile Code') {
            steps {
                sh "mvn compile"
            }
        }
    }
C> Stage 3: Unit Test
Run the Unit Test cases using the maven, but it failed in the case of this project still we can make use of this in the Development Phase, But the test case failing should not make it into the Production Environment.
The command to run the test case is maven test ; but we now need to skip the test cases and it can be done with the help of flag -DskipTests=true
sh "mvn test -DskipTests=true"
Our Stage3 will look like
pipeline {
    agent any
    tools {
        maven 'maven3'
        jdk 'jdk17'
    }

    stages {
        stage('Checkout') {
            steps {
                git branch: 'main', url: 'https://github.com/adityadhopade/Ekart.git'
            }
        }

        stage('Compile Code') {
            steps {
                sh "mvn compile"
            }
        }

        stage('Unit Test') {
            steps {
                sh "mvn test -DskipTests=true"
            }
        }
    }
D> Stage 4: SonarScan Analysis
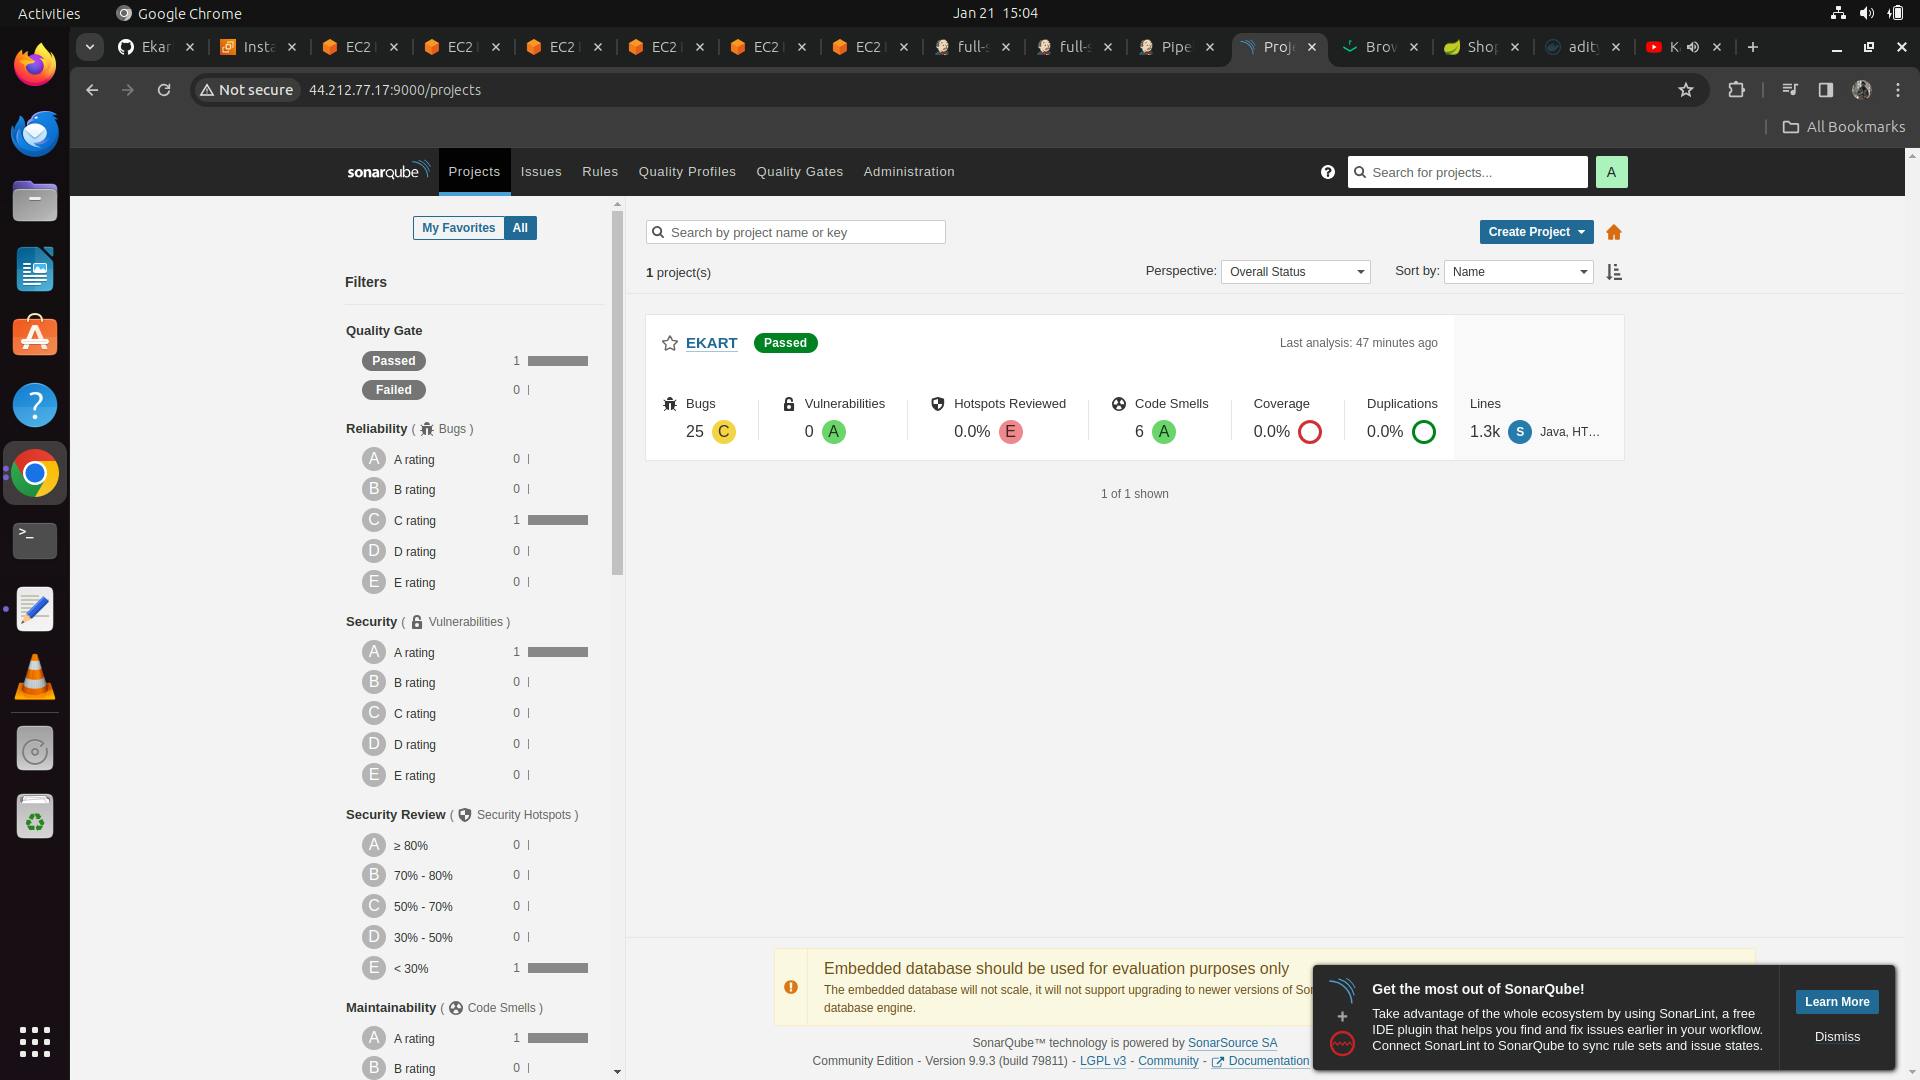
Sonar Scanner is used to get the CodeSmells, Bugs, Quality Gates, and Quality Profile of our applications.
We can set the environment variables for the sonar scanner as SCANNER_HOME ;
    environment {
        SCANNER_HOME = tool 'sonar-scanner'
    }
Make use of the Pipeline Syntax Generator => withSonarqubeEnv add the generated token (sonar-token) to access the sonar dashboard
withSonarQubeEnv(credentialsId: 'sonar-token', installationName: '') {
    // some block
}
But rather than providing the "credentialsId" of the server, we can simply pass the sonar server that we have configured;
As we have earlier configured the sonar server; with the credentials it will come in handy here.
Our block will look like
withSonarQubeEnv('sonar') {

}
Now to scan the Project we can make use of the executable stored under the $SCANNER_HOME/bin/sonar-scanner
# But to scan the project we need to send the following details like as below
Pass the name of the project => -D sonar.projectKey=EKART
Pass the project name => -D sonar.projectName=EKART
Pass the JavaBinaries[As our project is Javabased it consist of binary file and consider current directory with .] => -D sonar.java.binaries=.
Our Block will look like
withSonarQubeEnv('sonar') {
    sh ''' $SCANNER_HOME/bin/sonar-scanner -D sonar.projectKey=EKART -D sonar.projectName=EKART -D sonar.java.binaries=.
}
Our Sonar - Analysis Stage will look like
pipeline {
    agent any
    tools {
        maven 'maven3'
        jdk 'jdk17'
    }

    environment {
        SCANNER_HOME = tool 'sonar-scanner'
    }

    stages {
        stage('Checkout') {
            steps {
                git branch: 'main', url: 'https://github.com/adityadhopade/Ekart.git'
            }
        }

        stage('Compile Code') {
            steps {
                sh "mvn compile"
            }
        }

        stage('Unit Test') {
            steps {
                sh "mvn test -DskipTests=true"
            }
        }

        stage('sonar analysis') {
            steps {
                withSonarQubeEnv('sonar') {
                  sh ''' $SCANNER_HOME/bin/sonar-scanner -D sonar.projectKey=EKART -D sonar.projectName=EKART \
                  -D sonar.java.binaries=. '''
                }
            }
        }
    }
E> Stage 5: OWASP Dependency Check
Owasp Dependency is used to check if there are any codes to detect and report on publicly disclosed vulnerabilities, thereby improving application security
We can save this report under our project for getting the typical report of vulnerability scans.
Generate the Syntax for the Dependency Check with the help of the Pipeline Syntax \=> DependecyCheck: Invoke Dependency Check
dependencyCheck additionalArguments: '', odcInstallation: 'DC'
We also need to provide some additional arguments i.e. to scan the Dependency Files which are present under the "Pom.xml" so we can make use of it using --scan flag and as the Pom is present under the root directory so add it as ./
```
dependencyCheck additionalArguments: '--scan ./', odcInstallation: 'DC'
```
OWASP will generate the repost in the XML Format; we want it in the creation format; use the PipelineSyntax => Dependency Check Format Generator
#Set XML Format as
**/dependency-check-report.xml
Our Block will look likes as follows
dependencyCheckPublisher pattern: '**/dependency-check-report.xml'
Dependency-Check Block looks like
        stage('OWASP Dependency Check') {
            steps {
                dependencyCheck additionalArguments: '', odcInstallation: 'DC'
                dependencyCheckPublisher pattern: '**/dependency-check-report.xml'
            }
        }
F> Stage 6: Build Artifact using Maven
Using the maven to build the application; Using mvn package
Remember that in the maven lifecycle, it starts from compiling till the stage that we have provided; so it will run the Above steps for compile, Unit test;
Also at the unit test stage, we have skipped the test cases; we also need to add it in this stage also
To build an artifact using the maven it will be like this => mvn package
sh "mvn package -DskipTests=true"
Building Artifact using Maven Stage looks like
        stage('Build Application') {
            steps {
                sh "mvn package -DskipTests=true"
            }
        }
G> Stage 7: Deploy to Nexus Repository
In the pom.xml file, we have configured the artifact as a snapshot it will push it into the "maven-snapshot" repository in the development stage [As the artifact is not at the Production Level]
Use Pipeline Syntax and make use of the "withMaven: Provide Maven Environment"
Using this we can set the "maven version" and "jdk version", and make use of the "global maven settings config" [That we have set during configuring the Connect Jenkins to Nexus [JENKINS SERVER] ]
# Add the credentails there like
For maven : maven3
For jdk : jdk17
For Global maven Settings Config: MyGlobalSettings
Our Block will look like
withMaven(globalMavenSettingsConfig: 'global-maven', jdk: 'jdk17', maven: 'maven3', mavenSettingsConfig: '', traceability: true) {
    // some block
}
We need to deploy our artifact in the Nexus Repository. So we can make use of the maven command => mvn deploy
sh "mvn deploy -DskipTests=true"
Our Deploy to Nexus Repository Stage will look like
        stage('Deploy to Nexus') {
            steps {
                withMaven(globalMavenSettingsConfig: 'global-maven', jdk: 'jdk17', maven: 'maven3', mavenSettingsConfig: '', traceability: true) {
                    sh "mvn deploy -DskipTests=true"
                }
            }
        }
Setting Up the Kubernetes Cluster
We will need to create 3 Nodes with the SAME configuration in AWS as below;
1 Master; 2 Worker Nodes
- Basic configuration: t2 medium ; 15 GB Storage; instance count: 3


Add the same Security Group as we had created for the Jenkins, Sonar,Jenkins
- Change the name of the all the Nodes as k8-Master; Worker-01; Worker-02
Setting Up the MasterNode and Worker Nodes [Using Kubeadm]
sudo apt-get update -y
sudo apt-get install docker.io -y
sudo service docker restart

#Add Kubernets Repository
sudo curl -s https://packages.cloud.google.com/apt/doc/apt-key.gpg | apt-key add -

echo "deb http://apt.kubernetes.io/ kubernetes-xenial main" >/etc/apt/sources.list.d/kubernetes.list

sudo apt-get update

# Install Kubernetes Componenets
sudo apt install kubeadm=1.20.0-00 kubectl=1.20.0-00 kubelet=1.20.0-00 -y
Run all the above commands in both the Master and Worker Nodes.
Setting Up the MasterNode ONLY
# Add the Pod Network CIDR
kubeadm init --pod-network-cidr=192.168.0.0/16
After running the above command by the root user it will generate a link to join other worker nodes at the end like below.
kubeadm join 172.31.89.0:6443 --token iotnjn.b50nhy71wg2be2pc \
    --discovery-token-ca-cert-hash sha256:d5cba19e1f3be8657c90e143a5b671ea9b39c9c5e749c6c66116a0a1ce3fecc9
NOTE: We can add the link to any number of the VMs, but the catch is that it should come up with the required kubeadm, and kubectl installations preconfigured to make them WorkerNodes.
As we have made dedicated Worker-01 and Worker-02 for adding up as worker nodes; we will make use of those; Run the above command in worker nodes; It will give a message like this.
message: node has joined the cluster.
Also the Master Node; gives out content like as below
Your Kubernetes control-plane has initialized successfully!

To start using your cluster, you need to run the following as a regular user:

  mkdir -p $HOME/.kube
  sudo cp -i /etc/kubernetes/admin.conf $HOME/.kube/config
  sudo chown $(id -u):$(id -g) $HOME/.kube/config

Alternatively, if you are the root user, you can run:

  export KUBECONFIG=/etc/kubernetes/admin.conf
We can either generate the "kubeconfig" file as OTHER THAN root user or make use of the Root User just export command. [I have used the commands for making use of the Other than root user ]
The other method works also fine.
Install the CNI Plugin like Calico() and Ingress Controller in the master plane
# Install Calico(by manifest files)
kubectl apply -f https://docs.projectcalico.org/v3.20/manifests/calico.yaml

## Install Ingress Controller
kubectl apply -f https://raw.githubusercontent.com/kubernetes/ingress-nginx/controller-v0.49.0/deploy/static/provider/baremetal/deploy.yaml
Creation of Service Account
What is a Service Account?
A service account is a type of non-human account that, in Kubernetes, provides a distinct identity in a Kubernetes cluster. Application Pods, system components, and entities inside and outside the cluster can use a specific ServiceAccount's credentials to identify as that ServiceAccount.
Service accounts are a namespace.
Service accounts exist in the cluster and are defined in the Kubernetes API. You can quickly create service accounts to enable specific tasks.
We need to create the service account for the jenkins user so that it can create the necessary Kubernetes resources when the application gets deployed.
# Add a yml file
Add sa.yml file

#Add the content in the yml file
apiVersion: v1
kind: ServiceAccount
metadata:
  name: jenkins
  namespace: webapps
Here in our master node the namespace: webapps does not exist so we will need to add the namespace
kubectl create namespace webapps
Apply the changes to the file
kubectl apply -f sa.yml
Creation of Role [For webapps Namespace]
Roles define the actions a user can perform within a cluster or namespace, respectively. You can assign these roles to Kubernetes subjects (users, groups, or service accounts) with role bindings and cluster role bindings.
We are adding the Role for the creation of the K8 Resource; again we need to bind these resources using Service Account and Role
Add it inside the role.yml
apiVersion: rbac.authorization.k8s.io/v1
kind: Role
metadata:
  name: app-role
  namespace: webapps
rules:
  - apiGroups:
       - ""
       - apps
       - autoscaling
       - batch
       - extensions
       - policy
       - rbac.authorization.k8s.io
    resources:
       - pods
       - componentstatuses
       - configmaps
       - daemonsets
       - deployments
       - events
       - endpoints
       - horizontalpodautoscalers
       - ingress
       - jobs
       - limitranges
       - namespaces
       - nodes
       - pods
       - persistentvolumes
       - persistentvolumeclaims
       - resourcequotas
       - replicasets
       - replicationcontrollers
       - serviceaccounts
       - services
    verbs: ["get", "list", "watch", "create", "update", "patch", "delete"]
Apply the changes
kubectl apply -f role.yml
Creation of Role Binding
Adding the "Role Created" and "Service Account" in the Role binding K8 Object.
Roles and role bindings must exist in the same namespace. Role bindings can exist in separate namespaces for service accounts. Role bindings can link cluster roles, but they only grant access to the namespace of the role binding. Cluster role bindings link accounts to cluster roles and grant access across all resources.
Make a file assign.yml
apiVersion: rbac.authorization.k8s.io/v1
kind: RoleBinding
metadata:
  name: app-rolebinding
  namespace: webapps
roleRef:
  apiGroup: rbac.authorization.k8s.io
  kind: Role
  name: app-role
subjects:
- namespace: webapps
  kind: ServiceAccount
  name: jenkins
Now using this our Jenkins user will have all the necessary permissions to create the pods and other Kubernetes resources.
In real-time; we do not give the root account rather we could use the "service account" and add the "role" to manage the "role-binding" to give necessary permissions to Kubernetes Resources;
Create Token for Service Account [Creation of Secret]
Why do we need to create a Token (Secret) for a service account?
It's a standard practice to have the secret for every service account; we need the token to authenticate with the Kubernetes API.
Add the secret.yml
apiVersion: v1
kind: Secret
type: kubernetes.io/service-acount-token
metadata:
  name: mysecretname
  annotations:
    kubernetes.io/service-account.name: jenkins
Here in the above secret configuration, we have not specified any namespace
But we need to add this secret into our newly created namespace which is "webapps"
kubectl apply -f secret.yml -n webapps
To view the secret token we need to use it as
kubectl -n webapps describe secret mysecretname
OR
kubectl describe secret jenkins-token-<hash> -n webapps
Copy the token here[for future reference here]
eyJhbGciOiJSUzI1NiIsImtpZCI6IlBLRmdGN2NsdFJqbjhaYmxycEp4VndxdGFsTWhGbEdVdldvMUpMQlRvbjAifQ.eyJpc3MiOiJrdWJlcm5ldGVzL3NlcnZpY2VhY2NvdW50Iiwia3ViZXJuZXRlcy5pby9zZXJ2aWNlYWNjb3VudC9uYW1lc3BhY2UiOiJ3ZWJhcHBzIiwia3ViZXJuZXRlcy5pby9zZXJ2aWNlYWNjb3VudC9zZWNyZXQubmFtZSI6ImplbmtpbnMtdG9rZW4tZGhjcTYiLCJrdWJlcm5ldGVzLmlvL3NlcnZpY2VhY2NvdW50L3NlcnZpY2UtYWNjb3VudC5uYW1lIjoiamVua2lucyIsImt1YmVybmV0ZXMuaW8vc2VydmljZWFjY291bnQvc2VydmljZS1hY2NvdW50LnVpZCI6IjBkZTBjOWE3LWMyNDgtNDZlOC04OTgyLTJiYjNhMmM1NjQ0MSIsInN1YiI6InN5c3RlbTpzZXJ2aWNlYWNjb3VudDp3ZWJhcHBzOmplbmtpbnMifQ.BjlGDEIMPWGagi9cTB2a7HdG3IsrXjNy5_JxtE2UVyv_XQZwHP_AIEU021SQmrXcvMwe6F2sSmhidvKjuQgBp15i_1lQadaqca0p1KWXSXaD2lEjpdg2qlbc46Hjjn6kqNmyhAsD_w2xQdAHooZffWyUgypzWfl3JP6Vz1_cbPtrcOy6MmSwzTWAlf3zid4BqrdddAwIHxQJfaY2LmO0qPNrhry5nazDw2_XRnaRrhELbpZp6f_j-fnTxVimaVo2ODS6aCOgmyLt4rlOsRJajOxGb25FqRp2kr0VxCJM_WhTvZIgcrjmfqlrFtrjetv-AkbJZG1h5Es497YUGKUcMw
Find the kubeconfig file in the Master
As it contains all the information of the Kubernetes Cluster that we need to use with the Jenkins
# Get to the kubeconfif file
cd ~/.kube
# check the config file once
# (it contains all the configuration of the cluster here)
cat config
In the config file, it will contain all the configurations of the Cluster.
H> Stage 8: Docker Build and Tag
We can make use of the Pipeline Syntax for configuring the Docker Registry Endpoint
Docker RegistryURL: Do not fill it[As it will contain only Public DockerHub Repository]
Registry Credentails : Add the Docker Credentials Specified in the Credentails
The Block will look like
withDockerRegistry(credentialsId: 'dockerhub-credentials') {
    // some block
}
Now to build the image use the docker build command;
sh "docker build -t <DOCKERHUB_NAME>/<REPOSITORY NAME>:<TAG NAME> -f docker/Dockerfile ."
sh "docker build -t adityadho/ekart:latest -f docker/Dockerfile ."
So our Docker Build and Tag Block looks as
        stage('Docker Build and Tag') {
            steps {
                script {
                    withDockerRegistry(credentialsId: 'dockerhub-credentials') {
                       sh "docker build -t adityadho/ekart:latest -f docker/Dockerfile ."
                    }
                }
            }
        }
I> Stage 9: Trivy for Vulnerability Scans
As Trivy is not installed yet; it needs to be installed in the Jenkins Server
Install Trivy
#INstallation Steps
sudo apt-get install wget apt-transport-https gnupg lsb-release
wget -qO - https://aquasecurity.github.io/trivy-repo/deb/public.key | sudo apt-key add -
echo deb https://aquasecurity.github.io/trivy-repo/deb $(lsb_release -sc) main | sudo tee -a /etc/apt/sources.list.d/trivy.list
sudo apt-get update
sudo apt-get install trivy

OR
wget https://github.com/aquasecurity/trivy/releases/download/v0.18.3/trivy_0.18.3_Linux-64bit.deb
sudo dpkg -i trivy_0.18.3_Linux-64bit.deb
To scan the image using trivy we set it as
trivy image <iamge-name>
sh "trivy image adityadho/ekart:latest"
But we will always need to log onto the console output to see the changes; rather than that we could store the report in some text file as below
sh "trivy image adityadho/ekart:latest > trivy_report.txt"
Our Trivy Vulnerability scan will look like
        stage('Trivy Scanning') {
            steps {
                sh "trivy image adityadho/ekart:latest > trivy_report.txt"
            }
        }
J> Stage 10: Pushing Docker Image to the DTR
It will consist of the same stage as that of the Docker Build and Tag
Use the docker push command to push the image into the Docker Trusted Repository
        stage('PUSH Image to DTR') {
            steps {
                script {
                    withDockerRegistry(credentialsId: 'dockerhub-credentials') {
                       sh "docker push adityadho/ekart:latest"
                    }
                }
            }
        }
K> Stage 11: Deploy using Kubernetes
Make use of the Pipeline Syntax [withKubeConfig]
But before that also add a global credential and then add the secret text. The secret text will be nothing but the token that we have created above;
- Add credential ==> k8-token(created just now)
- Add server-endpoint ==> Getting into the kubeconfig file and copy the server field ==> https://172.31.89.0:6443
- namespace ==> webapps
We will have our block ready as follows
withKubeConfig(caCertificate: '', clusterName: '', contextName: '', credentialsId: 'k8-token', namespace: 'webapps', restrictKubeConfigAccess: false, serverUrl: 'https://172.31.89.0:6443') {
    // some block
}
Before adding the Deployment steps there we need to do some other configurations in deploymentservice.yml
Changes in the deploymentservice.yml
- Changing the Image name to "image: adityadho/ekart:latest"
- Changing the Deployment ContainerPort from "8080" to "8070" [As in the Dockerfile wehave exposed the 8070 and our application is running on the PORT 8070]
- Changing the Port and targetPort both to 8070 [type: Nodeport]
- PORT => On whihc the service is running on the CLuster
- targetPort => Port on whihc our application is running
Let us write the commands to deploy the Kubernetes Cluster
 sh "kubectl apply -f deploymentservice.yml -n webapps"
 sh "kubectl get svc -n webapps"
Our jenkins needs the "kubectl installation" while running the pipelines; so we can install it with the use of the Jenkins Server
sudo snap install kubectl --classic
TRY AND BUILD THE PIPELINE; The pipeline will run through all the stages

Our SonarQube Dashboard will look as follows

Our Nexus Repository will looks like this
Further to check our application running we need to move to check the service
kubectl get svc -n webapps
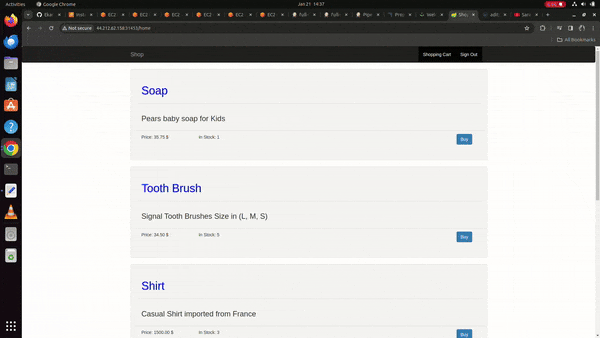
To log into the application
username: admin
password: admin

http://<worker-node-ip>:<generated-port-number-console-o/p>/home

Perform any operations it should work on that application
Working Demo
Conclusion
We have learned to develop the whole CICD Pipeline, and create the Jenkins file from scratch; I hope you found it interesting and do try your hands out on this.
Follow my Endeavors