Deploy Real Time Chat App on EC2 using Docker, AWS ECR, Terraform and S3
Deploy Real Time Chat App on EC2 using Docker, AWS ECR, Terraform and S3


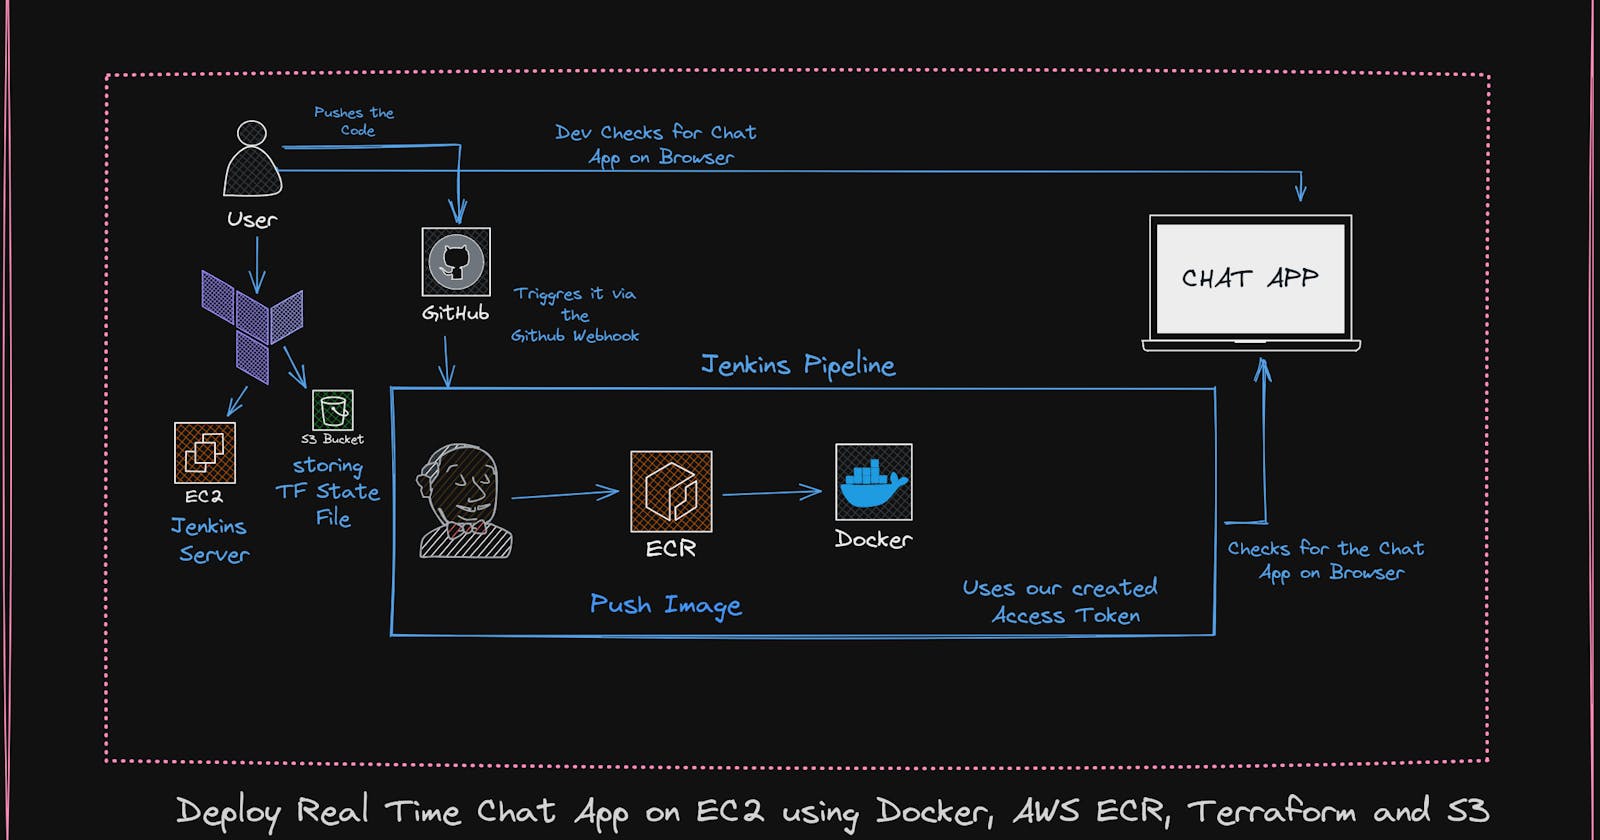
Table of contents
- 🌟 Key Tools and Moments 🌟
- PREREQUISITES
- Create the Repository and ADD the GitHub P.A.T.
- Accessing Jenkins Dashboard
- [MUST DO] PREPARING JENKINS PIPELINE(Add GitHub P.A.T.)
- A> Getting started with DockerFIle Creation
- B> Provisioning Resources using Terraform
- C> Install Necessary Jenkins Plugin
- C> Writing the Jenkins File
- D> Running Jenkins pipeline and monitoring the output
- WORKING DEMO:
- Summary
In this, we will see how to use the Github Personal Access Token with the Jenkins pipeline that pushes the image to the ECR(Elastic Container Registry) with the private Repository in GitHub
🌟 Key Tools and Moments 🌟
Creating the GitHub PAT
Implementing Terraform Scripts to Create the EC2 Jenkins Server
Adding the Installations via the User Data
Creating a Private Repository
Build a Docker File
Pushing the Image to the ECR
Deploying to Docker
PREREQUISITES
Preconfigured credentials of AWS using the AWS CLI
AWS CLI Users need to have privileges Admin Access(Ease of Convenience)
Terraform Installed
GitHub Account
[MUST] COPY the Repository from Below
%[github.com/adityadhopade/chat-app-jenkins]
Let us first try to run the application locally we can run the application using in the folder in the root folder of the project
node server.js
Create the Repository and ADD the GitHub P.A.T.
CLONE THE REPO FROM HERE {MAKE IT PRIVATE}
After cloning it move to the Settings of GitHub ==> Developer Settings ==> Personal Access tokens ==> Fine grain Tokens
Note that: Write a name to “Note” for this token that will create, set an expiration date, and select the scope that you need or all. Finally, click on “Generate token”,
Copy the token and save it in a safe place for later use

Accessing Jenkins Dashboard
Go to Jenkins Dashboard ==> cat <path to file> in the terminal and add it to the password
Initially to login
user: admin
password: <hash-generated-via-cat-command>
Create the user
user : admin
pasword: admin@123
[MUST DO] PREPARING JENKINS PIPELINE(Add GitHub P.A.T.)
To prepare a Jenkins pipeline, go to the Jenkins dashboard and click on “New Item” to create a pipeline.
Enter an item name, for example, mine “chat-app-pipeline” then select “Pipeline” and click “OK”
Check the Discard Old Builds
Days To keep Builds = 1
Max number of Builds to keep = 3
Configure the Jenkins pipeline for integrating the “GitHub Personal Access Token” as described below;
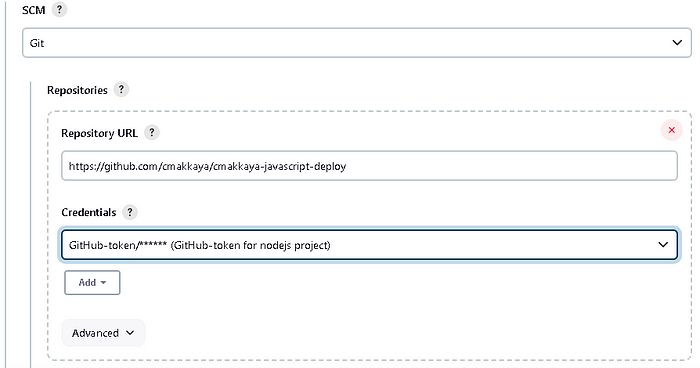
Select “Pipeline script from SCM” in the definition, Select “Git” in the SCM, Paste your GitHub repository address into “Repository URL”, and Correct the branch as “*/main”,
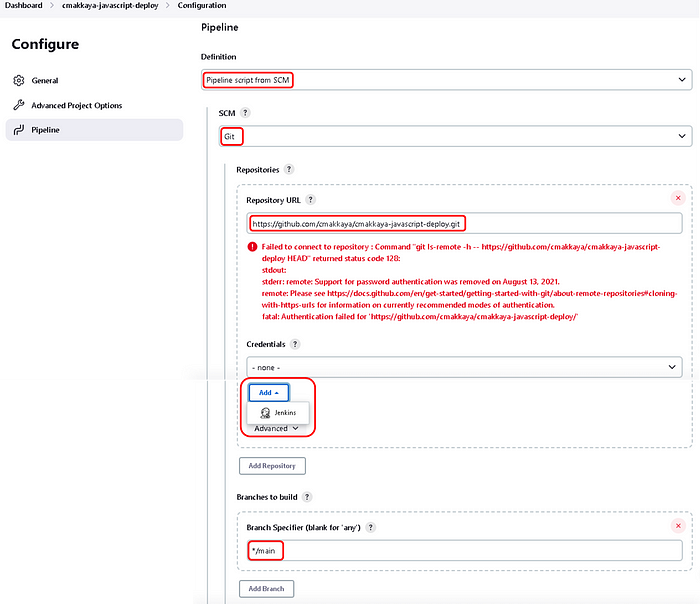
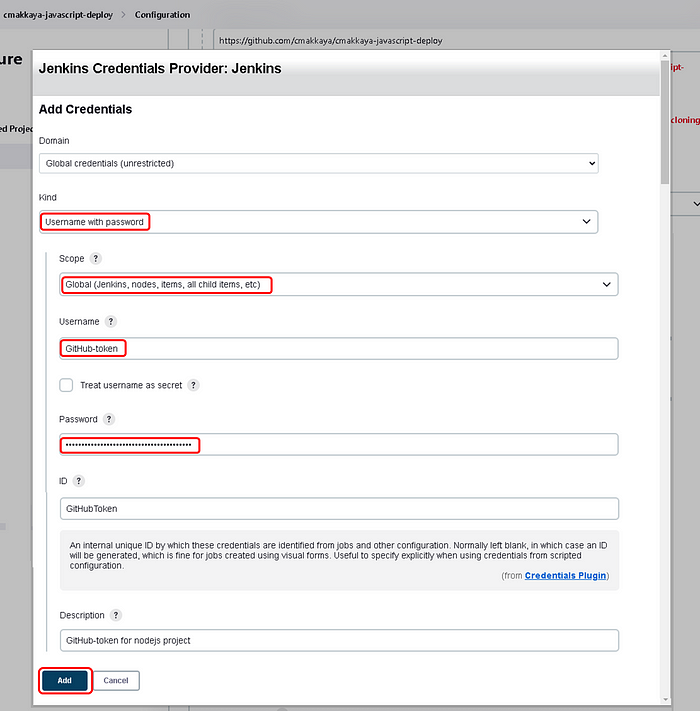
In the opened “Jenkins Credential Provider: Jenkins” window; Choose exactly what is shown below and paste your “GitHub Personal Access Token” in the “Password”, as shown
Choose “GitHub-token/******(GitHub-token for nodejs project) in the Credentials section

The red failed warning will disappear when you select the value from the Credentials dropdown
Write “Jenkinsfile” to the “Script Path
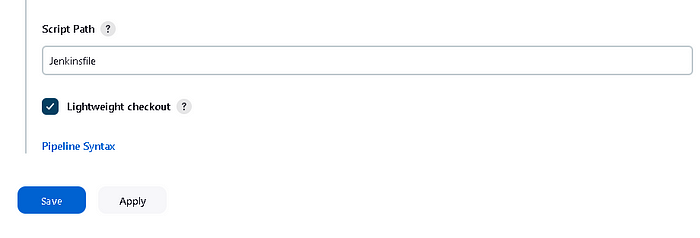
Jenkins Pipeline will be ready now
A> Getting started with DockerFIle Creation
For the real-time chat application, we have used the following steps
# It indicates the base image to be used for the application
FROM node:16.20.1

# When a conatiner is created; setting the Working Directory as "app"
WORKDIR /app

# Need to copy the package.json explictly before (answered in Trivia below)
COPY package.json ./

# To install all the dependencies of the project
RUN npm install

# Copies everyting from the current directory to the containers current directory "/app"
COPY . .

# Our application is Exposed on the PORT 3000 (Does it really exposes application ?; Answered in Trivia below)
EXPOSE 3000

# Commands to run when container starts (EnTRYPOINT also does the same ? Answered in Trivia below)
CMD ["npm", "run", "start"]
B> Provisioning Resources using Terraform
We are considering here the jenkins-server.tf file and backend.tf file also and what does that mean
#Considering that you have already logged in with your credentails in the
# AWS CLI
provider "aws" {
  region = "us-east-1"
  # access_key = "" #Add only if you do not have credentail added AWS CLI
  # secret_key = "" #Add only if you do not have credentail added AWS CLI
}
Using the locals block to get the pem key stored in the local folder for the creation of the EC2 instance
locals {
  key_pair        = "development-server"            # you need to change this line
  pem_key_address = "~/.ssh/development-server.pem" # you need to change this line
}
This variable contains the list of PORTS we need to add
variable "sg-ports" {
  default = [80, 22, 8080]
}
We are creating the security group with the dynamic ingress block to traverse through all the ports stored in our variable sg-ports with the ingress iterator.
resource "aws_security_group" "ec2-sec-gr" {
  name = "jenkins-sec-gr"
  tags = {
    Name = "jenkins-sec-gr"
  }

  dynamic "ingress" {
    for_each = var.sg-ports
    content {
      from_port   = ingress.value
      to_port     = ingress.value
      protocol    = "tcp"
      cidr_blocks = ["0.0.0.0/0"]
    }
  }

  egress {
    from_port   = 0
    protocol    = "-1"
    to_port     = 0
    cidr_blocks = ["0.0.0.0/0"]
  }
}
We are adding the role of the EC2 instance created and the instance profile also should be added there. need to attach a role to the instance.
resource "aws_iam_role" "roleforjenkins" {
  name                = "ecr_jenkins_permission"
  managed_policy_arns = ["arn:aws:iam::aws:policy/AmazonEC2ContainerRegistryFullAccess", "arn:aws:iam::aws:policy/AdministratorAccess", "arn:aws:iam::aws:policy/AmazonECS_FullAccess"]
  assume_role_policy = jsonencode({
    Version = "2012-10-17"
    Statement = [
      {
        Action = "sts:AssumeRole"
        Effect = "Allow"
        Sid    = ""
        Principal = {
          Service = "ec2.amazonaws.com"
        }
      },
    ]
  })
}

resource "aws_iam_instance_profile" "ec2_profile" {
  name = "jenkinsprofile"
  role = aws_iam_role.roleforjenkins.name
}
Also now for the start player i.e. the EC2 instance we need to add the following script adding the details like ami, key name, and user_data will consist of all the stool scripts that need to be installed
resource "aws_instance" "jenkins-server" {
  ami           = "ami-0fc5d935ebf8bc3bc" # ubuntu chnage the ami here also
  instance_type = "t3.micro"
  key_name      = local.key_pair
  root_block_device {
    volume_size = 16
  }
  security_groups = ["jenkins-sec-gr"]
  tags = {
    Name = "Jenkins-Server"
  }
  iam_instance_profile = aws_iam_instance_profile.ec2_profile.name
  user_data            = <<-EOF
          #! /bin/bash
          # install git
          sudo apt install git -y

          # update os
          sudo apt update -y

          # set server hostname as Jenkins-Server
          sudo hostnamectl set-hostname "Jenkins-Server"

          # install java 17
          sudo touch /etc/apt/keyrings/adoptium.asc
          sudo wget -O /etc/apt/keyrings/adoptium.asc https://packages.adoptium.net/artifactory/api/gpg/key/public
          echo "deb [signed-by=/etc/apt/keyrings/adoptium.asc] https://packages.adoptium.net/artifactory/deb $(awk -F= '/^VERSION_CODENAME/{print$2}' /etc/os-release) main" | sudo tee /etc/apt/sources.list.d/adoptium.list
          sudo apt update -y
          sudo apt install temurin-17-jdk -y
          /usr/bin/java --version

          # install jenkins
          sudo wget -O /usr/share/keyrings/jenkins-keyring.asc \
            https://pkg.jenkins.io/debian-stable/jenkins.io-2023.key
          echo deb [signed-by=/usr/share/keyrings/jenkins-keyring.asc] \
            https://pkg.jenkins.io/debian-stable binary/ | sudo tee \
            /etc/apt/sources.list.d/jenkins.list > /dev/null
          sudo apt-get update -y
          sudo apt-get install jenkins
          sudo systemctl start jenkins
          sudo systemctl enable jenkins
          sudo systemctl status jenkins

          # install docker
          sudo apt install docker.io -y
          sudo usermod -aG docker ubuntu
          newgrp docker
          sudo chmod 777 /var/run/docker.sock
          sudo systemctl start docker
          sudo systemctl enable docker
          sudo systemctl status docker

          #add ubuntu and jenkins users to docker group
          sudo usermod -aG docker ubuntu
          sudo usermod -aG docker jenkins

          # configure docker as cloud agent for jenkins
          sudo cp /lib/systemd/system/docker.service /lib/systemd/system/docker.service.bak
          sudo sed -i 's/^ExecStart=.*/ExecStart=\/usr\/bin\/dockerd -H tcp:\/\/127.0.0.1:2375 -H unix:\/\/\/var\/run\/docker.sock/g' /lib/systemd/system/docker.service

          # systemctl daemon-reload
          sudo systemctl restart docker
          sudo systemctl restart jenkins

          # install aws cli version
          curl "https://awscli.amazonaws.com/awscli-exe-linux-x86_64.zip" -o "awscliv2.zip"
          sudo apt-get install unzip -y
          unzip awscliv2.zip
          sudo ./aws/install
          EOF
}
The overall script will look like this and we could establish our connection to the jenkins server using either the ec2 instance connector the SSH connection via the PEM key
provider "aws" {
  region = "us-east-1"
}


locals {
  key_pair        = "development-server"            # you need to change this line
  pem_key_address = "~/.ssh/development-server.pem" # you need to change this line
}


variable "sg-ports" {
  default = [80, 22, 8080]
}

resource "aws_security_group" "ec2-sec-gr" {
  name = "jenkins-sec-gr"
  tags = {
    Name = "jenkins-sec-gr"
  }

  dynamic "ingress" {
    for_each = var.sg-ports
    content {
      from_port   = ingress.value
      to_port     = ingress.value
      protocol    = "tcp"
      cidr_blocks = ["0.0.0.0/0"]
    }
  }

  egress {
    from_port   = 0
    protocol    = "-1"
    to_port     = 0
    cidr_blocks = ["0.0.0.0/0"]
  }
}


resource "aws_iam_role" "roleforjenkins" {
  name                = "ecr_jenkins_permission"
  managed_policy_arns = ["arn:aws:iam::aws:policy/AmazonEC2ContainerRegistryFullAccess", "arn:aws:iam::aws:policy/AdministratorAccess", "arn:aws:iam::aws:policy/AmazonECS_FullAccess"]
  assume_role_policy = jsonencode({
    Version = "2012-10-17"
    Statement = [
      {
        Action = "sts:AssumeRole"
        Effect = "Allow"
        Sid    = ""
        Principal = {
          Service = "ec2.amazonaws.com"
        }
      },
    ]
  })
}

resource "aws_iam_instance_profile" "ec2_profile" {
  name = "jenkinsprofile"
  role = aws_iam_role.roleforjenkins.name
}

resource "aws_instance" "jenkins-server" {
  ami           = "ami-0fc5d935ebf8bc3bc" # ubuntu chnage the ami here also
  instance_type = "t3.micro"
  key_name      = local.key_pair
  root_block_device {
    volume_size = 16
  }
  security_groups = ["jenkins-sec-gr"]
  tags = {
    Name = "Jenkins-Server"
  }
  iam_instance_profile = aws_iam_instance_profile.ec2_profile.name
  user_data            = <<-EOF
          #! /bin/bash
          # install git
          sudo apt install git -y

          # update os
          sudo apt update -y

          # set server hostname as Jenkins-Server
          sudo hostnamectl set-hostname "Jenkins-Server"

          # install java 17
          sudo touch /etc/apt/keyrings/adoptium.asc
          sudo wget -O /etc/apt/keyrings/adoptium.asc https://packages.adoptium.net/artifactory/api/gpg/key/public
          echo "deb [signed-by=/etc/apt/keyrings/adoptium.asc] https://packages.adoptium.net/artifactory/deb $(awk -F= '/^VERSION_CODENAME/{print$2}' /etc/os-release) main" | sudo tee /etc/apt/sources.list.d/adoptium.list
          sudo apt update -y
          sudo apt install temurin-17-jdk -y
          /usr/bin/java --version

          # install jenkins
          sudo wget -O /usr/share/keyrings/jenkins-keyring.asc \
            https://pkg.jenkins.io/debian-stable/jenkins.io-2023.key
          echo deb [signed-by=/usr/share/keyrings/jenkins-keyring.asc] \
            https://pkg.jenkins.io/debian-stable binary/ | sudo tee \
            /etc/apt/sources.list.d/jenkins.list > /dev/null
          sudo apt-get update -y
          sudo apt-get install jenkins
          sudo systemctl start jenkins
          sudo systemctl enable jenkins
          sudo systemctl status jenkins

          # install docker
          sudo apt install docker.io -y
          sudo usermod -aG docker ubuntu
          newgrp docker
          sudo chmod 777 /var/run/docker.sock
          sudo systemctl start docker
          sudo systemctl enable docker
          sudo systemctl status docker

          #add ubuntu and jenkins users to docker group
          sudo usermod -aG docker ubuntu
          sudo usermod -aG docker jenkins

          # configure docker as cloud agent for jenkins
          sudo cp /lib/systemd/system/docker.service /lib/systemd/system/docker.service.bak
          sudo sed -i 's/^ExecStart=.*/ExecStart=\/usr\/bin\/dockerd -H tcp:\/\/127.0.0.1:2375 -H unix:\/\/\/var\/run\/docker.sock/g' /lib/systemd/system/docker.service

          # systemctl daemon-reload
          sudo systemctl restart docker
          sudo systemctl restart jenkins

          # install aws cli version
          curl "https://awscli.amazonaws.com/awscli-exe-linux-x86_64.zip" -o "awscliv2.zip"
          sudo apt-get install unzip -y
          unzip awscliv2.zip
          sudo ./aws/install
          EOF
}
Consider the backend.tf file will consist of our backed i.e. the Terraform State file will be stored under the s3 bucket which will hold our state of the Terraform file and the Terraform State file acts as the single source of truth for the Terraform scripts.
terraform {
  backend "s3" {
    bucket = "adityadhopade-jenkins" #Add your unique bucket
    key    = "EKS/terraform.tfstate" #Add the folder eks
    region = "us-east-1" # region of the bucket ;keep it same as instance
  }
}
Run the Terraform scripts
terraform init
terraform validate
terraform plan
terraform apply --auto-approve
C> Install Necessary Jenkins Plugin
Go to Jenkins Dashboard ==> cat <path to file> in the terminal and add it to the password
Initially to login
user: admin
password: <hash-generated-via-cat-command>
Create the user
user : admin
pasword: admin@123
To Add a plugin ==> manage Jenkins ==> Install Plugin ==> Search for "GitHub plugin"

C> Writing the Jenkins File
We need to create a Jenkinsfile for the Jenkins pipeline to work. The following Jenkinsfile consists of 4 stages (3).
Stage 1: Provides the necessary AWS credential, connects to Amazon ECR then creates a private repository for the image. Note: You can review the article below for a detailed explanation of the aws ecr commands in this stage.
pipeline {
    agent any
    environment {
        // change your registry name after creating it from the newly created ecr_registry
        // get the details fromn the edit repository
        ECR_REGISTRY="869190274350.dkr.ecr.us-east-1.amazonaws.com"

        // give your repo name in here that you have given in here
        APP_REPO_NAME="adityadhopade/chat-app-jenkins"
        AWS_REGION="us-east-1"
        PATH="/usr/local/bin/:${env.PATH}"
    }

    stages {
        stage('Create ECR Repo') {
            steps {
                echo "Creating ECR Repo for nodejs app"
                sh 'aws ecr get-login-password --region us-east-1 | docker login --username AWS --password-stdin "$ECR_REGISTRY"'
                sh '''
                aws ecr describe-repositories --region ${AWS_REGION} --repository-name ${APP_REPO_NAME} || \
                        aws ecr create-repository \
                        --repository-name ${APP_REPO_NAME} \
                        --image-scanning-configuration scanOnPush=true \
                        --image-tag-mutability IMMUTABLE \
                        --region ${AWS_REGION}
                '''
            }
        }
    }
}
To obtain the ECR_REGISTRY you can do is follow these steps
Create a “Jenkins Job” and name it “create-ecr-docker-registry” to create a Docker Registry manually on AWS ECR,
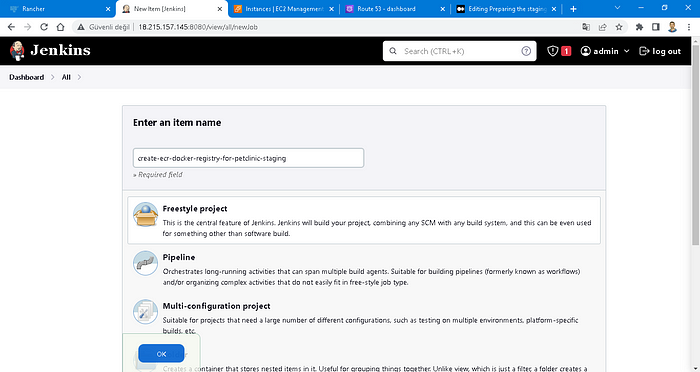
Go to the build step section, and select “Execute Shell” from the drop-down menu. Then, copy the following content, and paste the “Execute Shell” box
Add the Script to the box like
PATH="$PATH:/usr/local/bin"
APP_REPO_NAME="cmakkaya/microservices-application-staging"
AWS_REGION="us-east-1"

aws ecr describe-repositories --region ${AWS_REGION} --repository-name ${APP_REPO_NAME} || \
aws ecr create-repository \
  --repository-name ${APP_REPO_NAME} \
  --image-scanning-configuration scanOnPush=false \
  --image-tag-mutability IMMUTABLE \
  --region ${AWS_REGION}
What each command does is that
- PATH=”$PATH:/usr/local/bin” :
When we enter any command on the command line, the shell asks for the PATH. PATH checks the command whether entered in the bin and etc directories. If it finds, the command will run, if not, it will send an error message. Here we add the /usr/local/bin directory to the PATH variable, in order not to have problems with the commands that will run in the script below.
* “APP_REPO_NAME” and “AWS_REGION” :
We set our repo name and region variables with them in order to use them in aws ecrcommands.
The OR Operator “||”:
The OR operator will execute the command that follows only if the preceding command fails, i.e., returns an exit code of 0. Thus, the first command “aws ecr describe” will check whether the repo that we specified in the “APP_REPO_NAME” variable is in AWS ECR. If there is no repo with that name, it will run the second command “aws ecr create” to create a repo in AWS ECR.
With “aws ecr create-repository” command
repository-name ${APP_REPO_NAME} :
It will create a repo with this name.
* image-scanning-configuration scanOnPush=false :
Amazon ECR image scanning helps in identifying software vulnerabilities in your container images (4). We turn this feature off with false.
* image-tag-mutability IMMUTABLE :
With the “IMMUTABLE” statement, it allows images in the repo NOT to be overwritten.
* region ${AWS_REGION} :
The AWS ECR repo will be created in this region.
Apply and Save it ==> Click on Build Now ==> Check the AWS ECR Console our will be created there
[MUST NOTE] We are creating this so that we can set the ECR_REGISTRY in the environment variable. It will satisfy our 1st condition in OR that is we have created the ECR Repository and it will not move to the second condition here (to create a new repository)
From the AWS ECR Repository now created we can obtain the ECR_REGISTRY name in the Edit Repository (highlighted here)
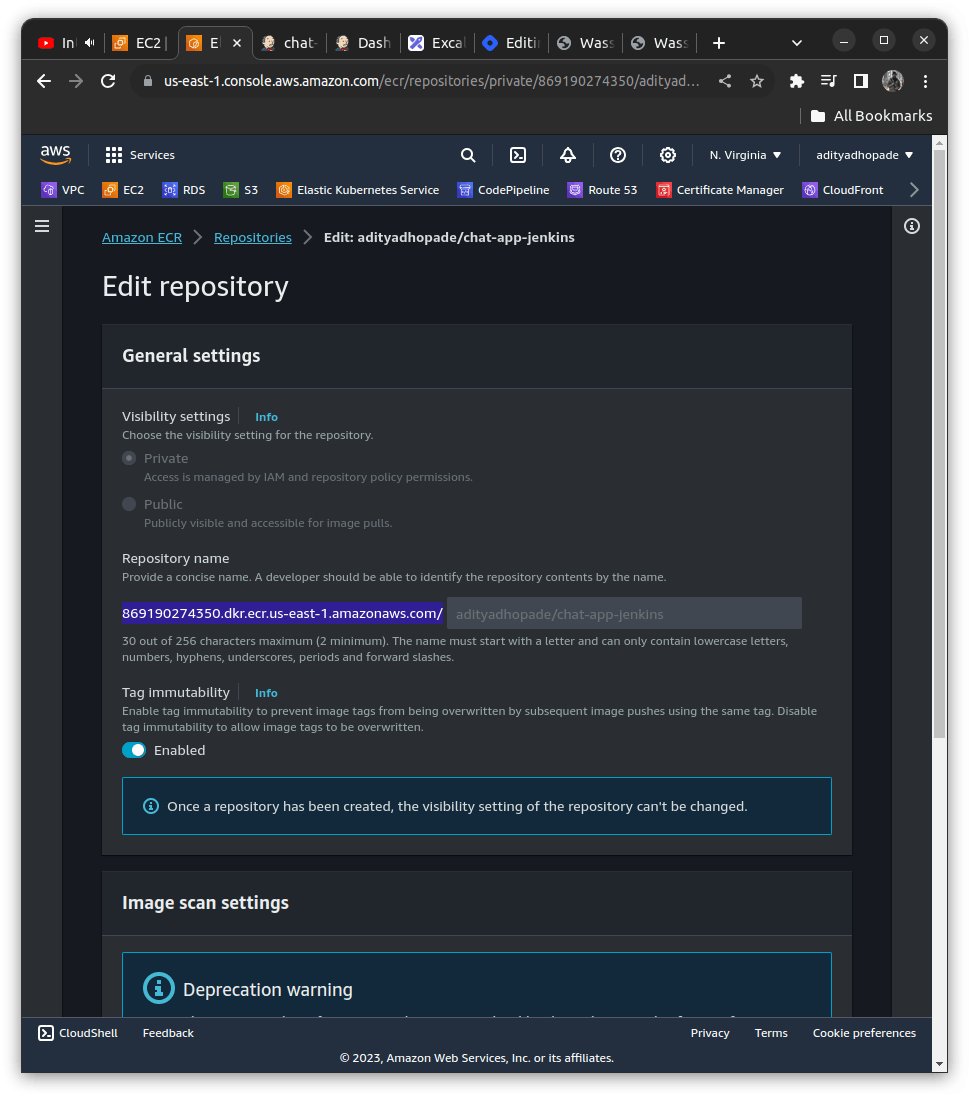
We can add it to the environment variable and also add some other variables as
pipeline {
    agent any
    environment {
        // change your registry name after creating it from the newly created ecr_registry
        // get the details fromn the edit repository
        ECR_REGISTRY="869190274350.dkr.ecr.us-east-1.amazonaws.com"

        // give your repo name in here that you have given in here
        // give it whatever you like
        APP_REPO_NAME="adityadhopade/chat-app-jenkins"
        AWS_REGION="us-east-1"
        PATH="/usr/local/bin/:${env.PATH}"
    }
}
Now as we have settled it up; It spans out to be like this
pipeline {
    agent any
    environment {
        // change your registry name after creating it from the newly created ecr_registry
        // get the details fromn the edit repository
        ECR_REGISTRY="869190274350.dkr.ecr.us-east-1.amazonaws.com"

        // give your repo name in here that you have given in here
        APP_REPO_NAME="adityadhopade/chat-app-jenkins"
        AWS_REGION="us-east-1"
        PATH="/usr/local/bin/:${env.PATH}"
    }
    stages {
        stage('Create ECR Repo') {
            steps {
                echo "Creating ECR Repo for Chat app"
                sh 'aws ecr get-login-password --region us-east-1 | docker login --username AWS --password-stdin "$ECR_REGISTRY"'
                sh '''
                aws ecr describe-repositories --region ${AWS_REGION} --repository-name ${APP_REPO_NAME} || \
                        aws ecr create-repository \
                        --repository-name ${APP_REPO_NAME} \
                        --image-scanning-configuration scanOnPush=true \
                        --image-tag-mutability IMMUTABLE \
                        --region ${AWS_REGION}
                '''
            }
        }
    }
}
Stage 2: Builds Docker Image.
        stage('Build Docker Image') {
            steps {
                // We are forcefully removing if any build exist $ECR_REGISTRY/$APP_REPO_NAME:latest
                // Builds a new one ith the same tag as mentioned latest
                sh 'docker build --force-rm -t "$ECR_REGISTRY/$APP_REPO_NAME:latest" .'
                sh 'docker image ls'
            }
        }
Stage 3: Sends the created images to the Amazon ECR repository.
aws ecr get-login-password --region us-east-1

docker login --username AWS --password-stdin "$ECR_REGISTRY"
It displays a password that you can use with a container client of your choice to authenticate to any Amazon ECR registry that your IAM principal has access to and it is piped to the docker login so that the credentials of was ecr password would act as an input to the docker login.
        stage('Push Image to ECR Repo') {
            steps {
                sh 'aws ecr get-login-password --region us-east-1 | docker login --username AWS --password-stdin "$ECR_REGISTRY"'
                // Push the repository to the docker
                sh 'docker push "$ECR_REGISTRY/$APP_REPO_NAME:latest"'
            }
        }
Stage 4: Pull images from the Amazon ECR repository and this image creates a container on which our application runs.
        stage('Deploy') {
            steps {
                sh 'aws ecr get-login-password --region us-east-1 | docker login --username AWS --password-stdin "$ECR_REGISTRY"'
                sh 'docker pull "$ECR_REGISTRY/$APP_REPO_NAME:latest"'
                sh 'docker rm -f todo | echo "there is no docker container named todo"'
                sh 'docker run --name todo -dp 80:3000 "$ECR_REGISTRY/$APP_REPO_NAME:latest"'
            }
        }
Finally, It deletes all local images so that the server does not run out of capacity in a short time.
    post {
        always {
            echo 'Deleting all local images'
            sh 'docker image prune -af'
        }
    }
The Final Jenkins file will span out like this
pipeline {
    agent any
    environment {
        // change your registry name after creating it from the newly created ecr_registry
        // get the details fromn the edit repository
        ECR_REGISTRY="869190274350.dkr.ecr.us-east-1.amazonaws.com"

        // give your repo name in here that you have given in here
        APP_REPO_NAME="adityadhopade/chat-app-jenkins"
        AWS_REGION="us-east-1"
        PATH="/usr/local/bin/:${env.PATH}"
    }
    stages {
        stage('Create ECR Repo') {
            steps {
                echo "Creating ECR Repo for nodejs app"
                sh 'aws ecr get-login-password --region us-east-1 | docker login --username AWS --password-stdin "$ECR_REGISTRY"'
                sh '''
                aws ecr describe-repositories --region ${AWS_REGION} --repository-name ${APP_REPO_NAME} || \
                        aws ecr create-repository \
                        --repository-name ${APP_REPO_NAME} \
                        --image-scanning-configuration scanOnPush=true \
                        --image-tag-mutability IMMUTABLE \
                        --region ${AWS_REGION}
                '''
            }
        }
        stage('Build Docker Image') {
            steps {
                sh 'docker build --force-rm -t "$ECR_REGISTRY/$APP_REPO_NAME:latest" .'
                sh 'docker image ls'
            }
        }
        stage('Push Image to ECR Repo') {
            steps {
                sh 'aws ecr get-login-password --region us-east-1 | docker login --username AWS --password-stdin "$ECR_REGISTRY"'
                sh 'docker push "$ECR_REGISTRY/$APP_REPO_NAME:latest"'
            }
        }
        stage('Deploy') {
            steps {
                sh 'aws ecr get-login-password --region us-east-1 | docker login --username AWS --password-stdin "$ECR_REGISTRY"'
                sh 'docker pull "$ECR_REGISTRY/$APP_REPO_NAME:latest"'
                sh 'docker rm -f todo | echo "there is no docker container named todo"'
                sh 'docker run --name todo -dp 80:3000 "$ECR_REGISTRY/$APP_REPO_NAME:latest"'
            }
        }

    }

    post {
        always {
            echo 'Deleting all local images'
            sh 'docker image prune -af'
        }
    }
}
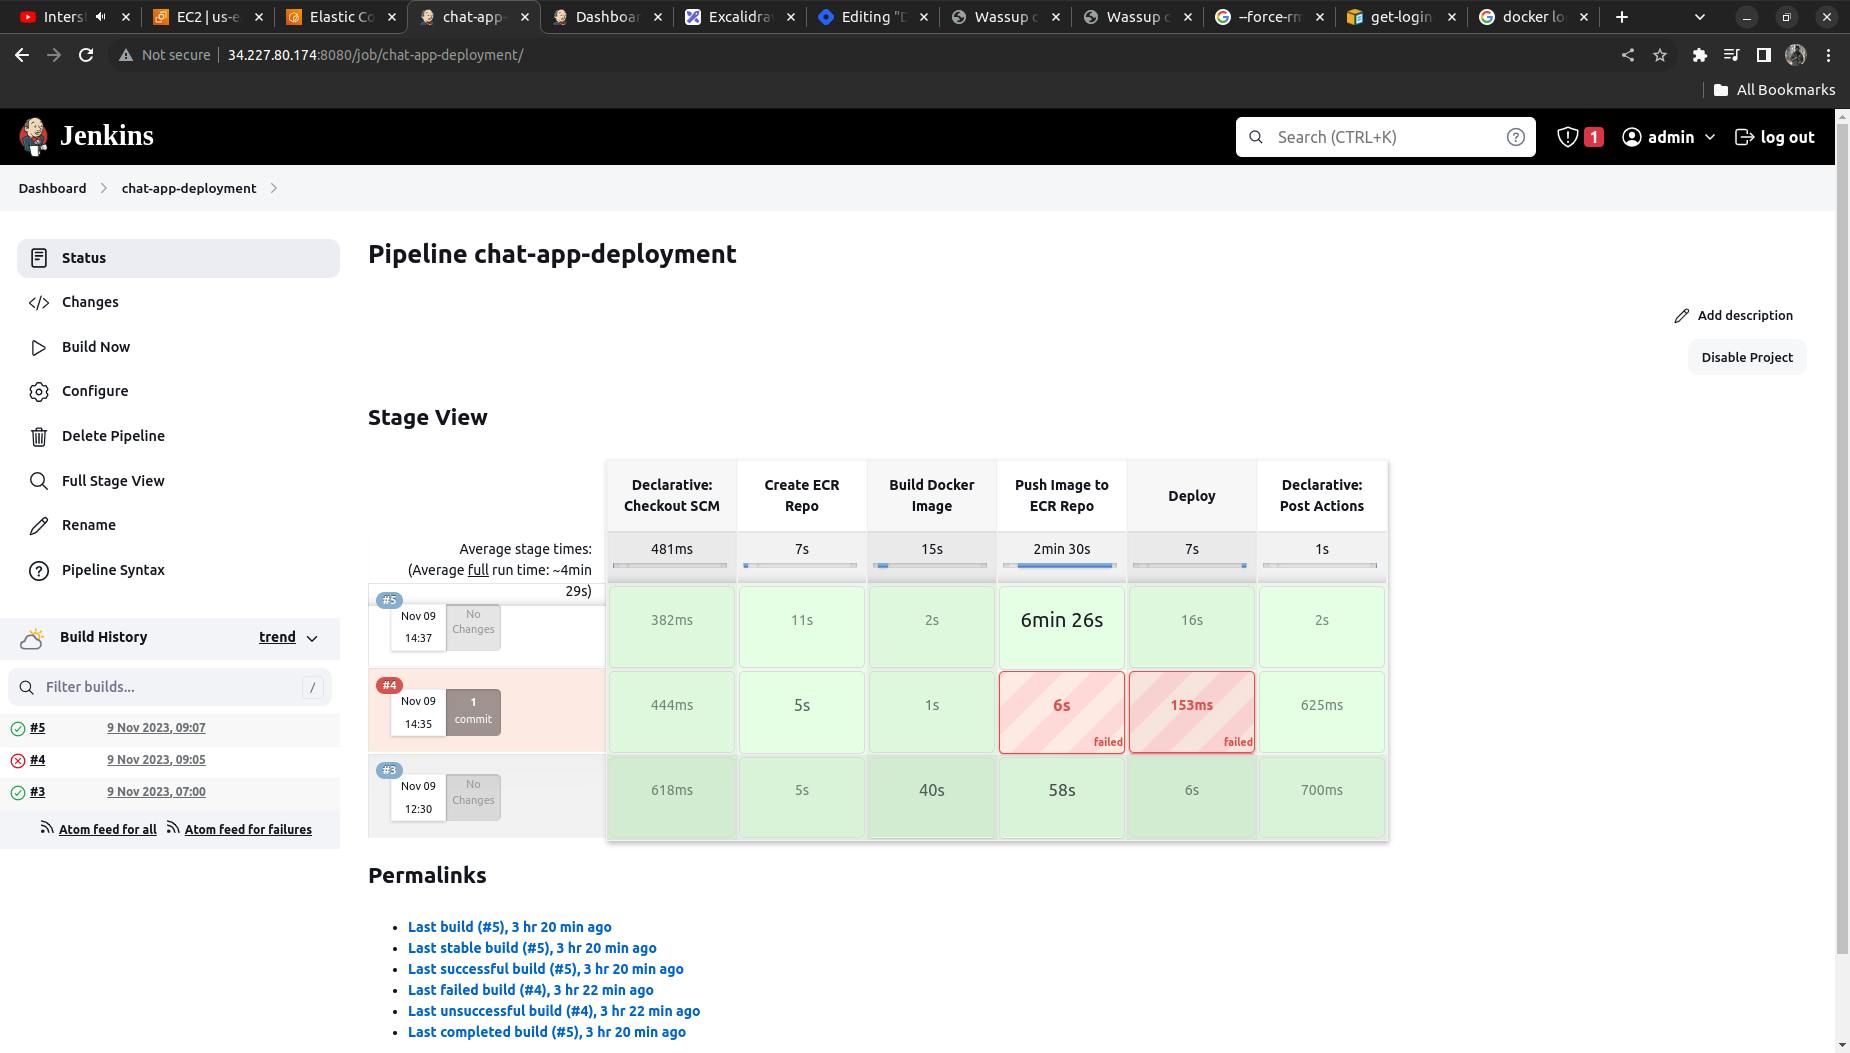
D> Running Jenkins pipeline and monitoring the output
To launch the Jenkins pipeline click on “Builld now”
Also, we can enhance it using the webhooks but for the sake of simplicity have kept it simple here.
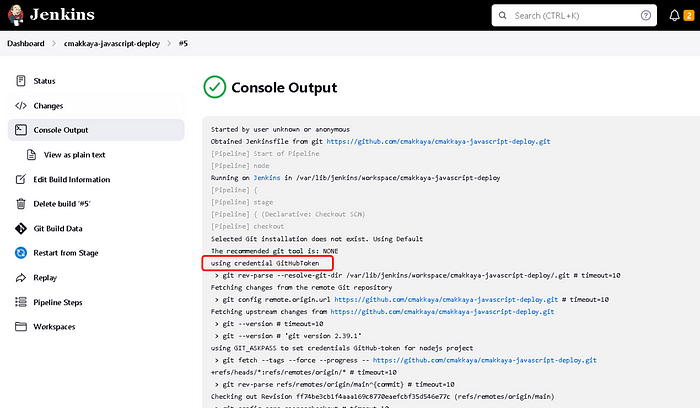
By entering the pipeline and clicking on the console output, we can see from the output that the GitHub Personal Access Token is used, and the image is built and run
Our pipeline will look something like this when properly executed (here I have executed it thrice)
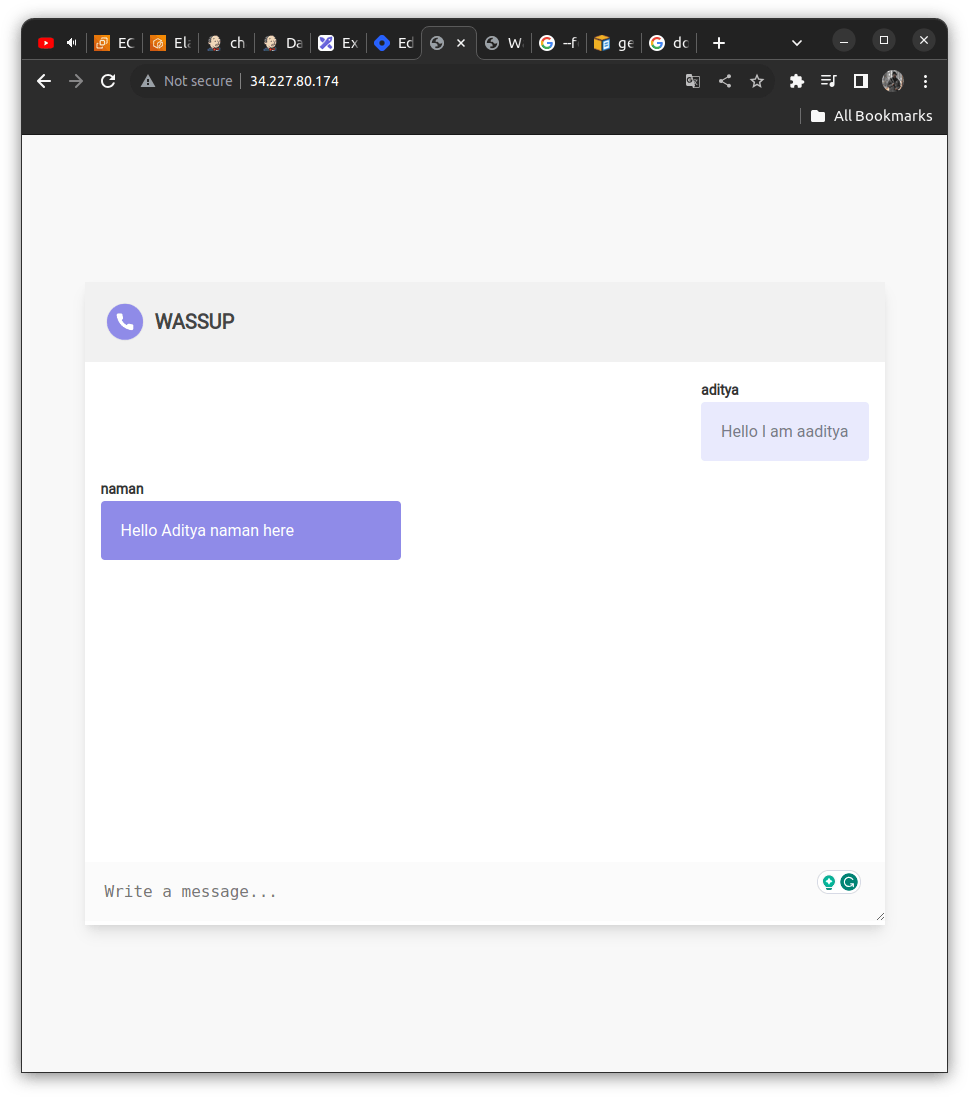
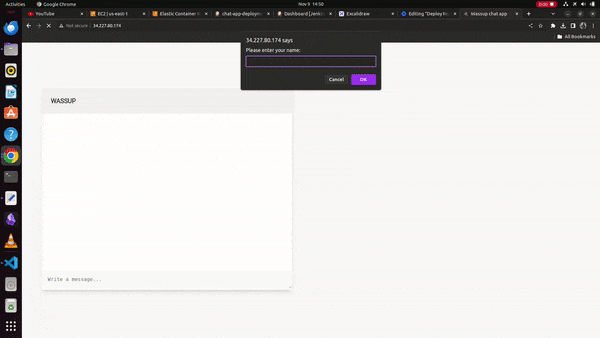
Finally, we can see the running chat application on the docker container at the Jenkins server public IP address,
Also, be sure to delete the resources created using the terraform or it will cost you
use the command below in the terminal
terraform destroy --auto-approve
Also, ensure to delete the GitHub Personal Access Token to safeguard your Git Account.
WORKING DEMO:
Summary
What we have achieved is we ran our code on a docker container. We built our code and then uploaded its image to Amazon ECR. Later, when we were going to run the Jenkins pipeline, we pulled the image from the Amazon ECR and ran it on a docker container.
If you like this content do try to implement it yourself; you will definitely gain some confidence. Thanks for going by I hope you like the content putting a heart will give a boost to my morale to post such amazing content to you guys.
Do follow my endeavors here