
Docker 101: Get Started with Docker, Commands, Docker File and much more
Get Started with Docker, Commands, Docker File and much more


If you’re a programmer or techie, chances are you’ve at least heard of Docker: a helpful tool for packing, shipping, and running applications within “containers.” It’d be hard not to, with all the attention it’s getting these days — from developers and system admins alike. Even the big dogs like Google, VMware and Amazon are building services to support it.
Regardless of whether or not you have an immediate use case in mind for Docker, I still think it’s important to understand some of the fundamental concepts around what a “container” is and how it compares to a Virtual Machine (VM). While the Internet is full of excellent usage guides for Docker, I couldn’t find many beginner-friendly conceptual guides, particularly on what a container is made up of. So, hopefully, this post will solve that problem :)
Let us understand why virtualization and docker were needed in the first place and then we can move forwards anyways.
Fall of the Virtual Machines and Rise of Containers
Sounds like too much Hollywood aint it but believe me the changes were very drastic and they shook the world. Jokes apart we will just have a glance upon the VM and Containers
Virtual Machines
The computer-generated computers that virtualization makes possible are known as virtual machines (VMs)—separate computers running on hardware that is contained in one physical computer.
Each VM requires its OS. The OS and any applications running on an individual VM share hardware resources from a single host server, or a pool of host servers. Thanks to the hypervisor, the hardware resources are virtualized and each VM is isolated from its neighbours.
Since the advent of affordable virtualization technology and cloud computing services, IT departments large and small have embraced VMs as a way to lower costs and increase efficiencies.
What is Hypervisor?
The software that enables virtualization is called a hypervisor. It’s a lightweight software layer that sits between the physical hardware and the virtualized environments and allows multiple operating systems (OS) to run in tandem on the same hardware.
I am sure most of you would have used the Hypervisors such as Virtual Box or VMware for installations of different OS on the Host OS.
Benefits of VM's
- All OS resources are available to apps.
The ability to run different operating systems on one physical machine.
Cost savings compared to running separate, physical machines.
Containers
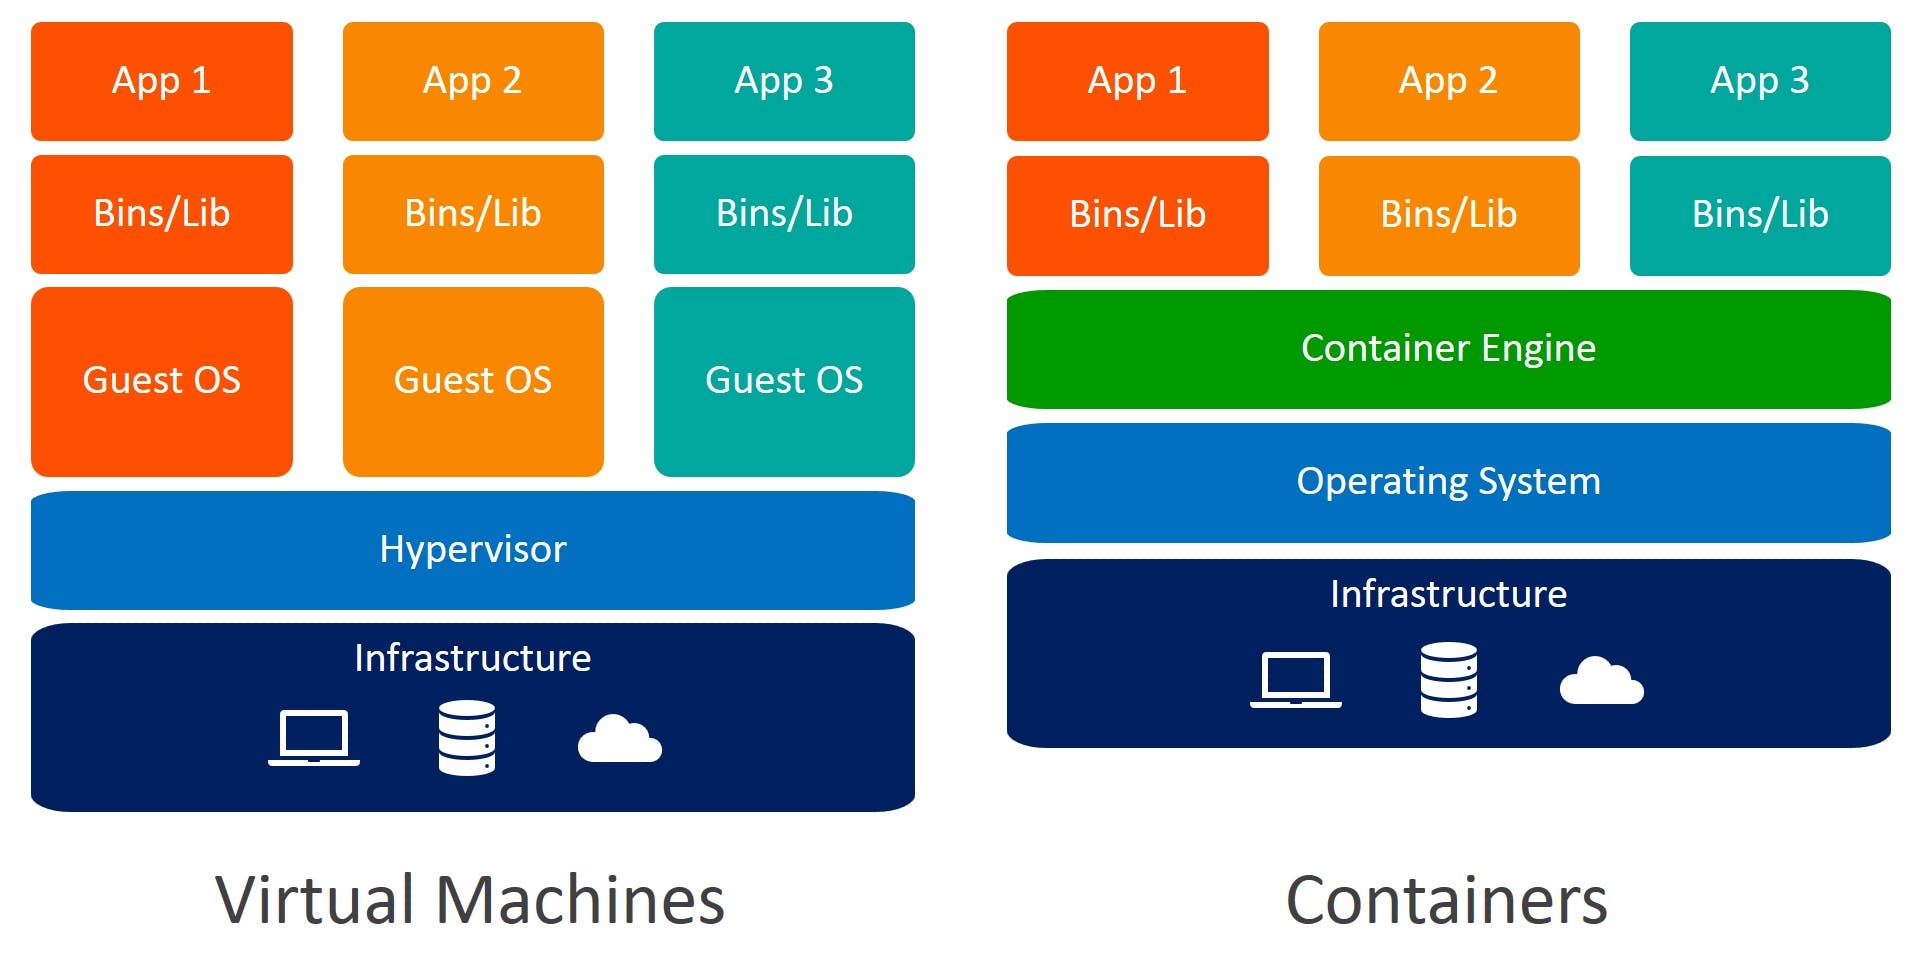
Unlike a VM which provides hardware virtualization, a container provides operating-system-level virtualization by abstracting the “user space”. You’ll see what I mean as we unpack the term container.
For all intents and purposes, containers look like a VM. For example, they have private space for processing, can execute commands as root, have a private network interface and IP address, allow custom routes and iptable rules, can mount file systems etc.
The one big difference between containers and VMs is that containers share the host system’s kernel with other containers.
The Containers package up just the user space, and not the kernel or virtual hardware like a VM does. Each container gets its own isolated user space to allow multiple containers to run on a single host machine. We can see that all the operating system-level architecture is being shared across containers. The only parts that are created from scratch are the bins and libs. This is what makes containers so lightweight
Benefits of Containers
GIves us Portability i.e. the ability to run anywhere
Uses the Resources Efficiently
Containers require less hardware, making it possible to increase server density and reduce data centre or cloud costs.
Containers are lightweight packages that everything needed to run, including their operating system, code, dependencies, and libraries.
Starting, Creating, and Replicating the containers are way too fast also the destruction is way too fast.
| Virtual Machines | Containers | |
| Required Storage Sizes | High | Low |
| Setup Required to be done by new users | High | Low |
| Applications Running on the OS | Application running on VM can run different OS | Applications running in a container environment share a single OS. |
| Security | Highly Secured | Less Secure |
| Time to run | Takes a lot of time | Runs Quickly |
| Usecase | VM’s are useful when we require all OS resources to run various applications. | While containers are useful when we are required to maximise the running applications using minimal servers. |
| Examples | VMware, VirtualBox, KVM etc | Docker, RancherOS etc |
Docker
Some History
In 2010, Solomon Hykes and Sebastien Pahl created Docker during the Y Combinator startup incubator group.
In 2011 the platform was launched.
No not this guy. He is Solomon Lane not Hykes.

Docker Introduction
Docker is an open-source project based on Linux containers. It uses Linux Kernel features like namespaces and control groups to create containers on top of an operating system.
Containers are far from new; Google has been using their own container technology for years. Other Linux container technologies include Solaris Zones, BSD jails, and LXC, which have been around for many years.

But why should we use Docker? why is it so hot?
Docker has made it much easier for anyone — developers, systems admins, architects and others — to take advantage of containers to quickly build and test portable applications. It allows anyone to package an application on their laptop, which in turn can run unmodified on any public cloud, private cloud, or even bare metal. The mantra is: “build once, run anywhere.”
Docker containers are very lightweight and fast. Since containers are just sandboxed environments running on the kernel, they take up fewer resources. You can create and run a Docker container in seconds, compared to VMs which might take longer because they have to boot up a full virtual operating system every time.
Docker users also benefit from the increasingly rich ecosystem of Docker Hub, which you can think of as an “app store for Docker images.” Docker Hub has tens of thousands of public images created by the community that are readily available for use. It’s incredibly easy to search for images that meet your needs, ready to pull down and use with little-to-no modification.
Docker makes it easy to break out your application’s functionality into individual containers. For example, you might have your Postgres database running in one container and your Redis server in another while your Node.js app is in another. With Docker, it’s become easier to link these containers together to create your application, making it easy to scale or update components independently in the future.
Last but not least, who doesn’t love simplicity ;)
What are Docker Containers?
A Docker container is a runtime instance of an image. From one image you can create multiple containers (all running the sample application) on multiple Docker platforms.
A container runs as a discrete process on the host machine. Because the container runs without the need to boot up a guest operating system it is lightweight and limits the resources (e.g. memory) which are needed to let it run.
First, get started with the Installation
We need to make sure that we have installed the Docker Community Edition (CE). This edition is ideal for developers looking to get started with Docker and experimenting with container-based apps — so this is the perfect choice for our use case.
Docker CE is available for all major platforms including MacOS, Windows and Linux. The specific steps needed to install Docker CE on your system can be found at https://docs.docker.com/get-docker/
Also could create and start with creating the account on the docker hub https://hub.docker.com
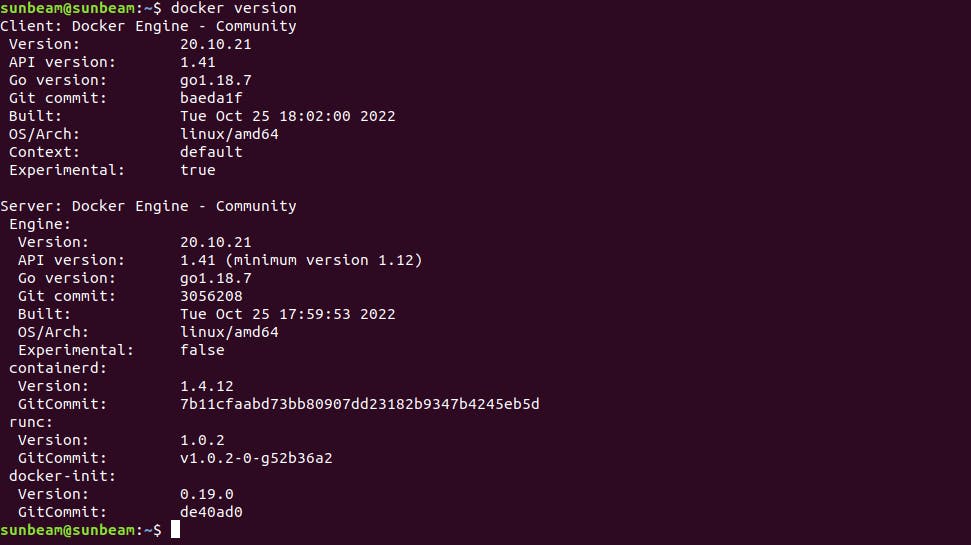
Once it is installed we will try and enter
docker

We can check which version of the docker is installed
What if we want to select a Docker Image?
Make sure you have logged in to the Docker Hub then use the search field to enter a search term which is matching the name of the application for which you’d like to find an existing Docker image.
Let us suppose you want to download the cowsay image from DockerHub a result will be presented like

On the details page, you can find an overview of the versions of this image and find links to the corresponding Dockerfiles. (I know you must be thinking like this but hold your horses)

What is DockerFile?
A Dockerfile is a text document that contains all the commands you would normally execute manually in order to build a Docker image. Docker can build images automatically by reading the instructions from a Docker file.
Later we’ll go through the process of writing a Dockerfile from scratch.
Let us work with the images and container here
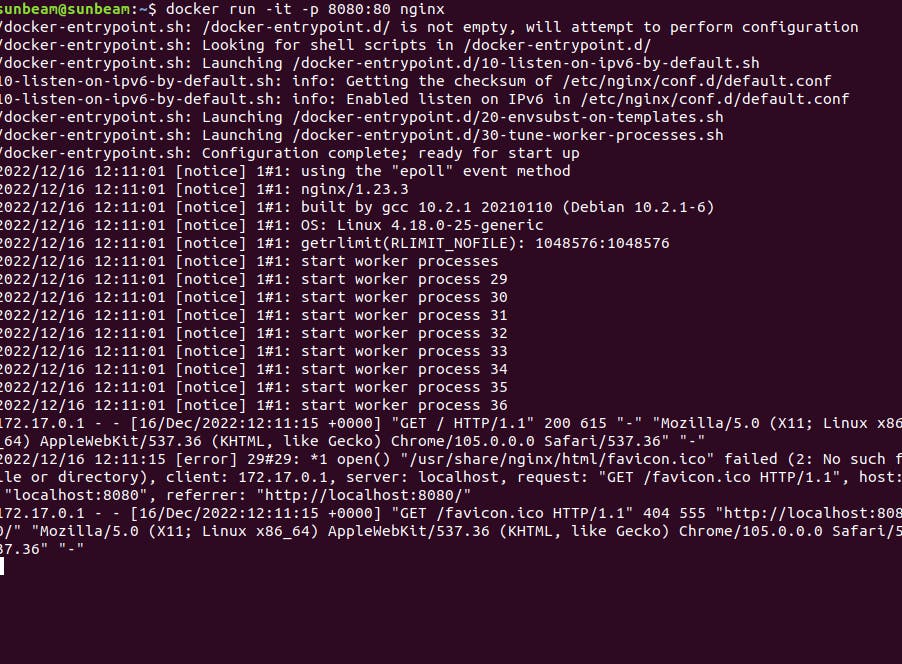
As we have earlier used the docker hub and looked out for the Nginx Docker Image and run it using the following command
docker run -it -p 8080:80 nginx

-it // executes in interactive mode

-p 8080:80 // by using the -p option we're connecting the internal port 80 of the container the the external port 8080. Because the Nginx server by default is running on port 80 we're then able to send HTTP request to the server from our local machine by opening up URL http://localhost:8080. It's also possible to connect an internal port to any other external port, e.g. connecting internal port 80 to external port 8080 (-p 8080:80). In this case we need to access http://localhost:8080.
The name of the Docker image we’d like to use for starting up the container needs to be supplied as well, in our case of Nginx.
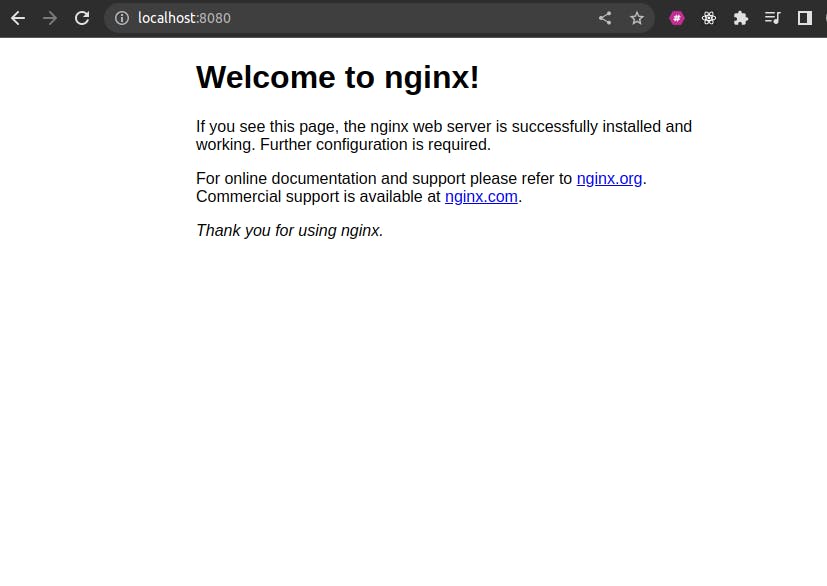
The response which is displayed in the browser when accessing the container by URL http://localhost:80 in the browser should be like what you can see in the following screenshot:
If we open a new terminal and on that, we can check out for the images running using
docker ps

If we want to delete the images and we could delete them by a unique container id ?
docker rm [CONTAINER_ID]
But are you able to delete the image guys ?

If we try to delete our Nginx container Docker is telling us that it’s not possible to delete a running image. Because we’re still running the container in interactive mode it’s easy to stop the container by just pressing CTRL+C in the terminal instance in which the container has been started. Now it is possible to delete the container by using the docker rm command.
Also, have you noticed that the image was not already present but has been downloaded? while ideally, we should first pull the image and then use but we can make a workaround and just download it at runtime. (Not ideally recommended)
docker pull <image_name>
Having deleted the container now the nginx image should still be available on our system. You can check this by using the following command
docker images

To delete the image from the system using the following command
docker images rm [IMAGE_ID]
The above example we are observing is in the Interactive Mode but we can also run the containers in the Detached Mode.
Running Containers in Detached Mode
Detached Mode - It means running the containers in the background
docker run -d -p 8080:80 nginx
To stop the docker container
docker ps -a // shows all the containers
docker stop [CONTAINER_ID]
Can we name a Container ?
docker run -d -p 80:80 --name mynginx01 nginx

// we can stop using the
docker stop mynginx01
Can we run a command in a running container?
Now that we have a running container we need to find ways to interact with the container and the application which is running inside of the container.
First of all lets see how we can run command inside of the running container. This is done by using the docker exec command. In the following example we're using that command to start a bash terminal for our running container myngin01.
docker exec -it mynginx01 bash
The command prompt will then be switched to the bash shell which is running in the container and you’re able to execute further command. For example you can enter the html directory of the Nginx web server by using the following command:
cd usr/share/nginx/html/
Inside this folder you’ll find a file index.html which contains the HTML code which is used to output the default Nginx page in the browser. To be able to see the HTML content of the file you can use the cat command:
cat index.html
What is Docker File ?
A Dockerfile is a collection of instructions that, once processed by the daemon, results in an image. Content for the Dockerfile is as follows:
FROM ubuntu:latest

EXPOSE 80

RUN apt-get update && \
    apt-get install nginx -y && \
    apt-get clean && rm -rf /var/lib/apt/lists/*

CMD ["nginx", "-g", "daemon off;"]
Images are multi-layered files and in this file, each line (known as instructions) that you've written creates a layer for your image.
Points to Remember while writing the Docker File / Observe in Docker File
Every valid
Dockerfilestarts with aFROMinstruction. This instruction sets the base image for your resultant image. By settingubuntu:latestas the base image here, you get all the goodness of Ubuntu already available in your custom image, so you can use things like theapt-getcommand for easy package installation.The
EXPOSEinstruction is used to indicate the port that needs to be published. Using this instruction doesn't mean that you won't need to--publishthe port. You'll still need to use the--publishoption explicitly. ThisEXPOSEinstruction works like documentation for someone who's trying to run a container using your image. It also has some other uses that I won't be discussing here.The
RUNinstruction in aDockerfileexecutes a command inside the container shell. Theapt-get update && apt-get install nginx -ycommand checks for updated package versions and installs NGINX. Theapt-get clean && rm -rf /var/lib/apt/lists/*command is used for clearing the package cache because you don't want any unnecessary baggage in your image. These two commands are simple Ubuntu stuff, nothing fancy. TheRUNinstructions here are written inshellform. These can also be written inexecform. You can consult the official reference for more information.Finally the
CMDinstruction sets the default command for your image. This instruction is written inexecform here comprising of three separate parts. Here,nginxrefers to the NGINX executable. The-ganddaemon offare options for NGINX. Running NGINX as a single process inside containers is considered a best practice hence the usage of this option. TheCMDinstruction can also be written inshellform. You can consult the official reference for more information.
To build an image using the Dockerfile you just wrote, open up your terminal inside the custom-nginx directory and execute the following command
docker image build .

//such logs would appear here

# Sending build context to Docker daemon  3.584kB
# Step 1/4 : FROM ubuntu:latest
#  ---> d70eaf7277ea
# Step 2/4 : EXPOSE 80
#  ---> Running in 9eae86582ec7
# Removing intermediate container 9eae86582ec7
#  ---> 8235bd799a56
# Step 3/4 : RUN apt-get update &&     apt-get install nginx -y &&     apt-get clean && rm -rf /var/lib/apt/lists/*
#  ---> Running in a44725cbb3fa
### LONG INSTALLATION STUFF GOES HERE ###
# Removing intermediate container a44725cbb3fa
#  ---> 3066bd20292d
# Step 4/4 : CMD ["nginx", "-g", "daemon off;"]
#  ---> Running in 4792e4691660
# Removing intermediate container 4792e4691660
#  ---> 3199372aa3fc
# Successfully built 3199372aa3fc
NOTE: If at any step the Docker image build fails then it will start from that step only.
I hope this article has received well with all of you guys. It will help you to get on and get started with the Docker Journey and I will try to keep posting often and make sure that you enjoy learning things and getting it done.
Till then Stay tuned for the next one. I hope you are having a good day!
Every Feedback is appreciated it will help me to get better and deliver you guys great content.