Setting up HPA and KubeMetrics Server for Application
Setting up HPA and KubeMetrics Server for Application


Let us start with brushing the basics; later move forward with the demo for HPA
What is HPA?
In Kubernetes, we can scale using 3 types they are
Horizonatl Pod Autoscaling[HPA]
Vertical Pod Autoscaling[VPA]
Cluster Autscaling[CA]
HPA [Horizontal Pod AutoScaler]
Let us think of the scenario of Production Service where we are required to scale and the load varies across the time; so for some time the load is relatively high but sometimes it is low.
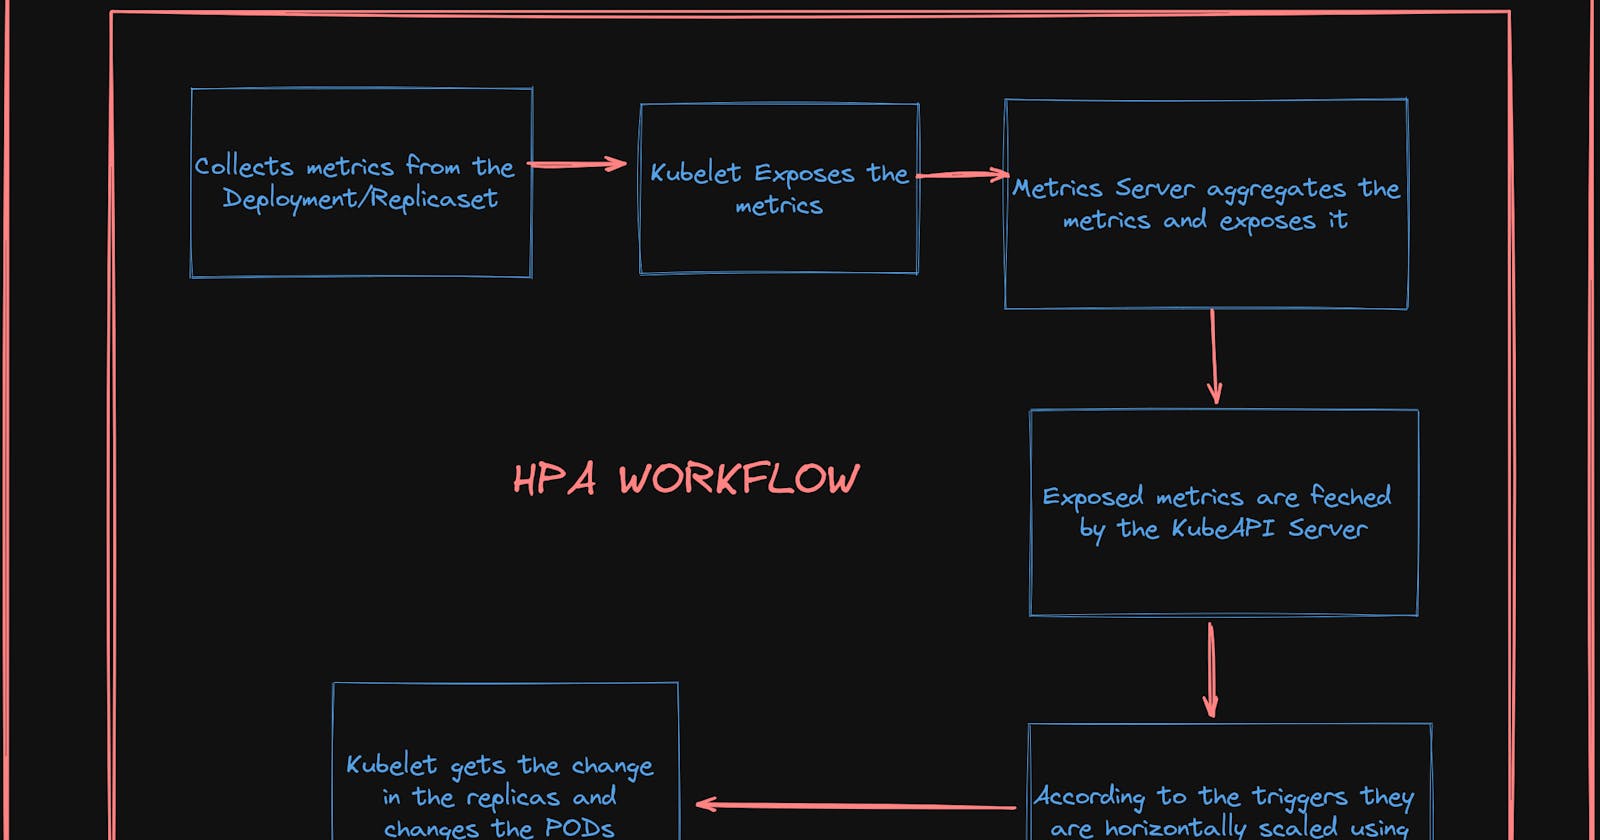
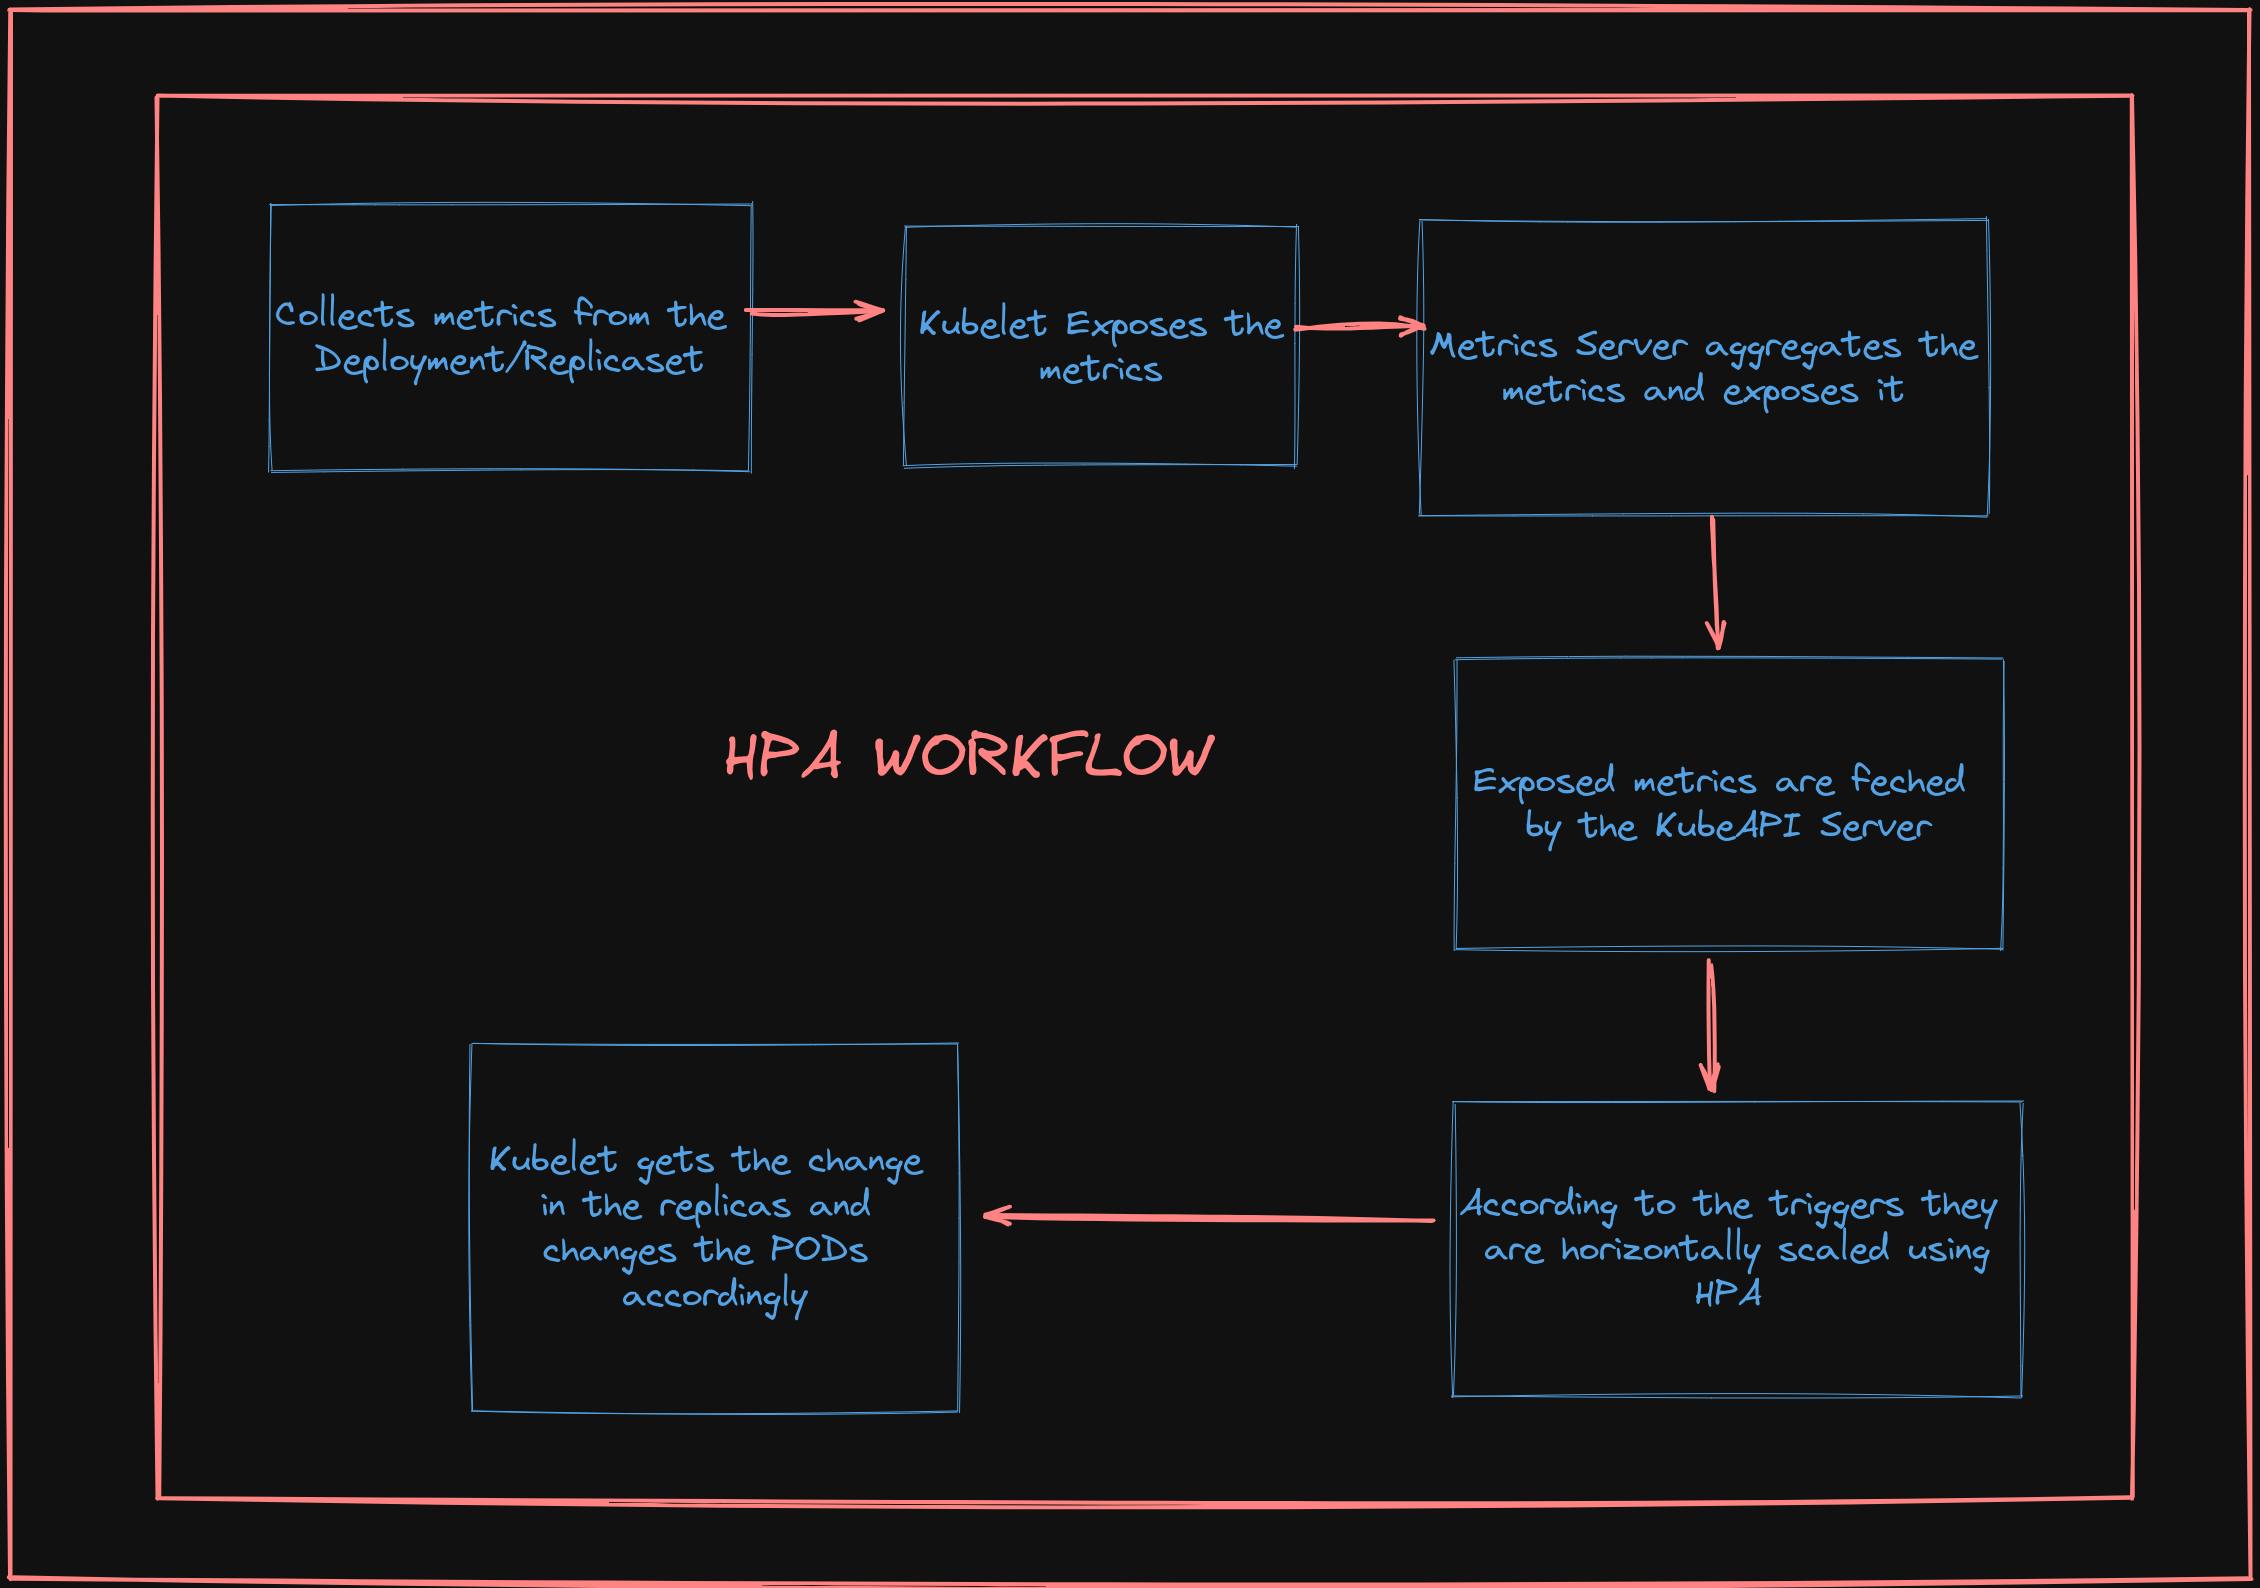
In Kubernetes, a HorizontalPodAutoscaler automatically updates a workload resource (such as a Deployment or StatefulSet), to auto-scale the workload to match demand.
In response to increasing the load, we will increase the count of underlying PODs defined in the K8 object files like Deployment or Stateful files.
Talking about the HPA it adjusts the number of replicas of the applications according to the Trigger we define;
The triggers can be of two types they are targetCPUUtilisation and targetmemUtilisation.
If we want any other triggers based on the other things that come into the region of custom metrics [We will talk later about this ]
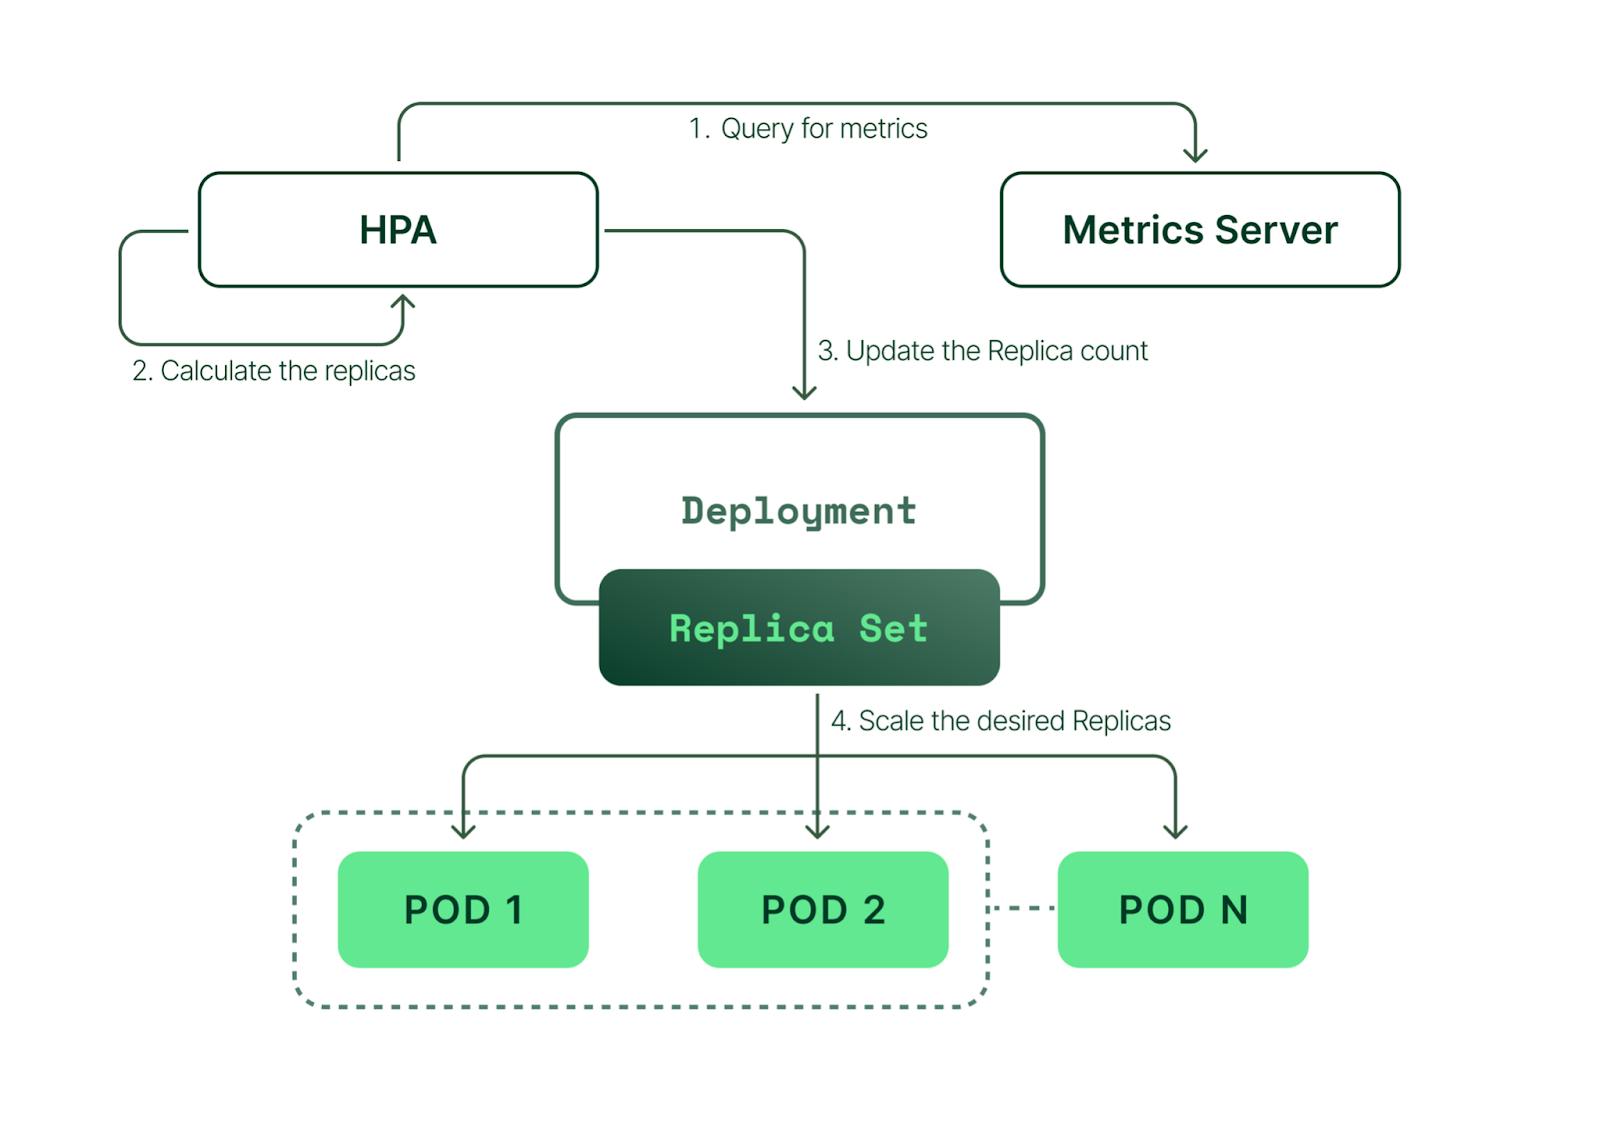
Internal Working of HPA
Let us start with the Setup first
Add the file as deployment.yaml containing both the service and deployments.
The Deployment contains the labels set as run: php-apache ; with the container running on PORT 80 with the defined Resource Request and Limits
The service we will be using will be of Type NODEPORT with the same label as the Deployment (indicating that this SVC is for the deployment above)
With the nodePort: 30002
apiVersion: apps/v1
kind: Deployment
metadata:
  name: php-apache
spec:
  selector:
    matchLabels:
      run: php-apache
  replicas: 1
  template:
    metadata:
      labels:
        run: php-apache
    spec:
      containers:
        - name: php-apache
          image: k8s.gcr.io/hpa-example
          ports:
            - containerPort: 80
          resources:
            limits:
              memory: 500Mi
              cpu: 100m
            requests:
              memory: 250Mi
              cpu: 80m
---
apiVersion: v1
kind: Service
metadata:
  name: php-apache-service
  labels:
    run: php-apache
spec:
  ports:
    - port: 80
      nodePort: 30002
  selector:
    run: php-apache
  type: NodePort
Apply the deployment file
kubectl apply -f deployment.yaml
It will create a service and its corresponding deployment and can check it using
kubectl get po
kubectl get svc
Now if we want to check whether our PHP application is running or not we can verify it using
minikube-ip:30002
To find out the minikube IP we will use
minikube ip

Alternatively could also use curl to hit the Apache server
curl http://192.168.49.2:30002/
curl http://<minikube-ip>:<NODE-PORT>
Creating the HPA
HPA will increase and decrease the number of replicas (via the deployment) to maintain an average CPU utilization across all Pods of 50% (since each pod requests 200 milli-cores by kubectl run), this means average CPU usage of 100 milli-cores)
We could use the imperative and declarative methods here
For Imperative Method(Not USED much as it's harder to track the changes like who applied the changes?)
kubectl autoscale deployment deployment --cpu-percent=50 --min=2 --max=10
For the Declarative Method we will create a folder "autoscaling" => "hpa-php-apache-auto-scaling.yaml"
In this file we will see tour auto scaler on the deployment "deployment.yaml" and setting the minimum and maximum replicas as 2 and 10 respectively ;
The HPA will get triggered using the targetCPUUtilizationPercentage set to 50%; so whenever the CPU utilization crosses over 50% it will autoscale with the new PODs;
Consider if the new PODs CpuUtilization also goes over 50% then it will scale and add up a new POD
In the case of Descaling; the scale will reach the minimum of minimumReplicas defined in the YAML file.
apiVersion: autoscaling/v1
kind: HorizontalPodAutoscaler
metadata:
  name: php-apache
spec:
  scaleTargetRef:
    apiVersion: apps/v1
    kind: Deployment
    name: php-apache
  minReplicas: 2
  maxReplicas: 10
  targetCPUUtilizationPercentage: 50
Applying the Changes defined in the hpa yaml file
kubectl apply -f hpa-php-apache-auto-scaling.yaml
Check out the resources created by hpa
kubectl get hpa
kubectl get horizontalpodautoscaler
NOTE: When getting the HPA we can see under the Target it shows unknown/50 ; it is due to the metrics server not installed.
Installing the Kube Metrics Server
It is the native K8 Object but by default, it is not installed.
It is crucial in sending out the Node Metrics Data to any 3rd Party Component that requires the Metrics to provide the metrics to the log server like
Kibanaor Dashboarding Tools likePrometheusandGrafanaIt should be running before setting up the HPA(or else it will not target according to the triggers provided as it can not monitor metrics here)
We can install it using the link below
wget https://github.com/kubernetes-sigs/metrics-server/releases/download/v0.5.0/components.yaml
It will create a yaml file components.yaml
To ensure secure communication we need to make changes in the components.yaml
In the deployment section, we need to add args
- --kubelet-insecure-tls
Holistic View will look like this
apiVersion: apps/v1
kind: Deployment
......
      containers:
      - args:
        - --cert-dir=/tmp
        - --secure-port=443
        - --kubelet-insecure-tls
        - --kubelet-preferred-address-types=InternalIP,ExternalIP,Hostname
        - --kubelet-use-node-status-port
        - --metric-resolution=15s
......
Now apply the changes that we have made for the components.yaml file
kubectl apply -f components.yaml
It will create the metrics server pod; in the kube-system namespace
kubectl get po -n kube-system
Using the metrics server we can access the resources of pods and nodes; it will give us the highest utilization of PODs and Nodes
kubectl top pods
kubectl top nodes
Now under the target, we will see the CPUUtilizationPercentage changing from <unknown>/50% to 1%/50% & 2%/50%, which means the HPA can now identify the current use of the CPU
NOTE: There should be a clear definition of the Resources, Requests, and Limits for the Pods containers; otherwise the CPU Utilization cannot be determined, and the Autoscaler cannot act as it will be unable to generate the metrics that are required during the trigger.
Increase the Load to test if HPA is working or not
We need to run the queries and hit our service indefinitely to increase the load; resulting in the triggering of the HPA
Running the commands like
kubectl run -it --rm load-generator --image=busybox /bin/sh
--rm ==> USed to remove the container; if gets down

#Inside the pseudo terminal run the commands to hit our svc indefinately
while true; do wget -q -O- http://<minikube ip>:<port number of php-apache-service>; done
As soon as we run the command The word “OK! OK! OK! OK!…” will start to appear. Our load (the infinite loop of queries) started to run.
In the new terminal check for the HPA
kubectl get hpa
As soon as the threshold hits it will create the replica and we can monitor it using the
watch -n3 kubectl get service,hpa,pod -o wide
We can see the increase in the count of the Replicas;
In the case of Descaling; it would go as low as the minimum Replicas .
NOTE: We can override the min, max, and CPU utilization using the Imperative Commands.
Stop the Load Generator => HIt ctrl+C and exit the pseudo-terminal
Then again verify the state of hpa; it will be back to normal after a certain time
kubectl get hpa
kubectl get deployments
Conclusion
We learned Kubernetes Autoscaling and the working logic of Horizontal Pod Autoscaler and Metric Server. We set up an HPA in the Kubernetes Cluster consisting of a PHP-Apache application. We tested whether our HPA was working by connecting to the K8s cluster. And we saw how the autoscaler reacts to increased load.