Setting up Kubernetes the Hard-way using Kubeadm, Kubectl, Kubelet
Setting up K8's using Kubeadm, Kubectl, kubelet


Let's cut to the chase and get some ideas about the following terminologies used in the Title.
What is Kubelet?
Kubelet is more of a process that helps create or disintegrate pods. Kubelet is the process that works on each node in the master and slave server of K8s architecture. Kubelet updates pods and docker containers only when they are told to do so
What is Kubectl?
kubectl is the Kubernetes-specific command line tool that lets you communicate and control Kubernetes clusters. Whether you're creating, managing, or deleting resources on your Kubernetes platform, kubectl is an essential tool.
What is Kubeadm?
Kubeadm is a really handy tool that can help you set up a Kubernetes cluster. Essentially, it automates the whole process by initializing the control plane and joining worker nodes to the cluster.
The best part is that it's a command-line tool, so it's super easy to use and works the same way no matter where you're setting up your cluster.
Why go for Kubeadm, not Minikube?
Miniube gives us only the single node setup on the local; while the Kubeadm allows us a highly available multi-node cluster setup
Yes we are not using the Minikube or Kind we will be using the Kubeadm now for our demo
Prerequisites for setting up the Infra:
AWS ACCOUNT with required permissions
2 - Ubuntu 20.04 LTS Serves 1x Manager (4GB RAM, 2 vCPU)t2. medium type, 1x Workers (1 GB, 1 Core) t2.micro type
Also full connectivity between the cluster machines
Need to make certain ports open in the master and worker nodes
# ON MASTER NODE

6443/tcp for Kubernetes API Server
2379-2380 for etcd server client API
6783/tcp,6784/udp for Weavenet CNI
10248-10260 for Kubelet API, Kube-scheduler, Kube-controller-manager, Read-Only Kubelet API, Kubelet health
80,8080,443 Generic Ports
30000-32767 for NodePort Services

# ON WORKER NODE
6783/tcp,6784/udp for Weavenet CNI
10248-10260 for Kubelet API etc
30000-32767 for NodePort Services
For our convenience, we can have the hostname changed in our case for both the master and slave
hostnamectl set-hostname <desired-name->
NOTE: We need to run the commands on all nodes as the root user(Both the master and slave)
NOTE: FOR TIME BEING we can also make the security group for the master and add the same to that of the slave node
Disable the SWAP for the imminent running of the Kubelet
swapoff -a
sed -i '/ swap / s/^\(.*\)$/#\1/g' /etc/fstab
Need to install Containerd (Container Engine)
wget https://github.com/containerd/containerd/releases/download/v1.6.16/containerd-1.6.16-linux-amd64.tar.gz
tar Cxzvf /usr/local containerd-1.6.16-linux-amd64.tar.gz
wget https://raw.githubusercontent.com/containerd/containerd/main/containerd.service
mkdir -p /usr/local/lib/systemd/system
mv containerd.service /usr/local/lib/systemd/system/containerd.service
systemctl daemon-reload
systemctl enable --now containerd
Install Runc -
runC is a lightweight, portable container runtime. It includes all of the plumbing code used by Docker to interact with system features related to containers.
wget https://github.com/opencontainers/runc/releases/download/v1.1.4/runc.amd64
install -m 755 runc.amd64 /usr/local/sbin/runc
Install CNI (Container Network Interface)
wget https://github.com/containernetworking/plugins/releases/download/v1.2.0/cni-plugins-linux-amd64-v1.2.0.tgz
mkdir -p /opt/cni/bin
tar Cxzvf /opt/cni/bin cni-plugins-linux-amd64-v1.2.0.tgz
Install CRICTL
crictl is a command-line interface for CRI-compatible container runtimes. You can use it to inspect and debug container runtimes and applications on a Kubernetes node.
VERSION="v1.26.0" # check latest version in /releases page
wget https://github.com/kubernetes-sigs/cri-tools/releases/download/$VERSION/crictl-$VERSION-linux-amd64.tar.gz
sudo tar zxvf crictl-$VERSION-linux-amd64.tar.gz -C /usr/local/bin
rm -f crictl-$VERSION-linux-amd64.tar.gz

cat <<EOF | sudo tee /etc/crictl.yaml
runtime-endpoint: unix:///run/containerd/containerd.sock
image-endpoint: unix:///run/containerd/containerd.sock
timeout: 2
debug: false
pull-image-on-create: false
EOF
PORT Forwarding the IPV4 and letting IPtables see the bridged traffic
cat <<EOF | sudo tee /etc/modules-load.d/k8s.conf
overlay
br_netfilter
EOF
sudo modprobe overlay
sudo modprobe br_netfilter
cat <<EOF | sudo tee /etc/sysctl.d/k8s.conf
net.bridge.bridge-nf-call-iptables = 1
net.bridge.bridge-nf-call-ip6tables = 1
net.ipv4.ip_forward = 1
EOF
sudo sysctl --system
sysctl net.bridge.bridge-nf-call-iptables net.bridge.bridge-nf-call-ip6tables net.ipv4.ip_forward
modprobe br_netfilter
sysctl -p /etc/sysctl.conf
Install KUBECTL, KUBELET AND KUBEADM
apt-get update && sudo apt-get install -y apt-transport-https curl
curl -s https://packages.cloud.google.com/apt/doc/apt-key.gpg | sudo apt-key add -
cat <<EOF | sudo tee /etc/apt/sources.list.d/kubernetes.list
deb https://apt.kubernetes.io/ kubernetes-xenial main
EOF
apt update -y
apt install -y kubelet kubeadm kubectl
sudo apt-mark hold kubelet kubeadm kubectl
sudo apt-mark hold kubelet kubeadm kubectl
RUN ON THE MASTER NODE AND FOLLOW THE INSTRUCTIONS
Run the Kubeadm commands
kubeadm config images pull
kubeadm init

#In this a token will generate and keep the token handy

kubeadm join 172.31.59.230:6443 --token 8sujah.ka75hoyjtg22bd3q \
        --discovery-token-ca-cert-hash sha256:3d5397f099b404e42d56872a9e2394fee49b45e12609c1604321e6ef78a7c20f
# These commands are also generated after kubeadm and run these on worker nodes
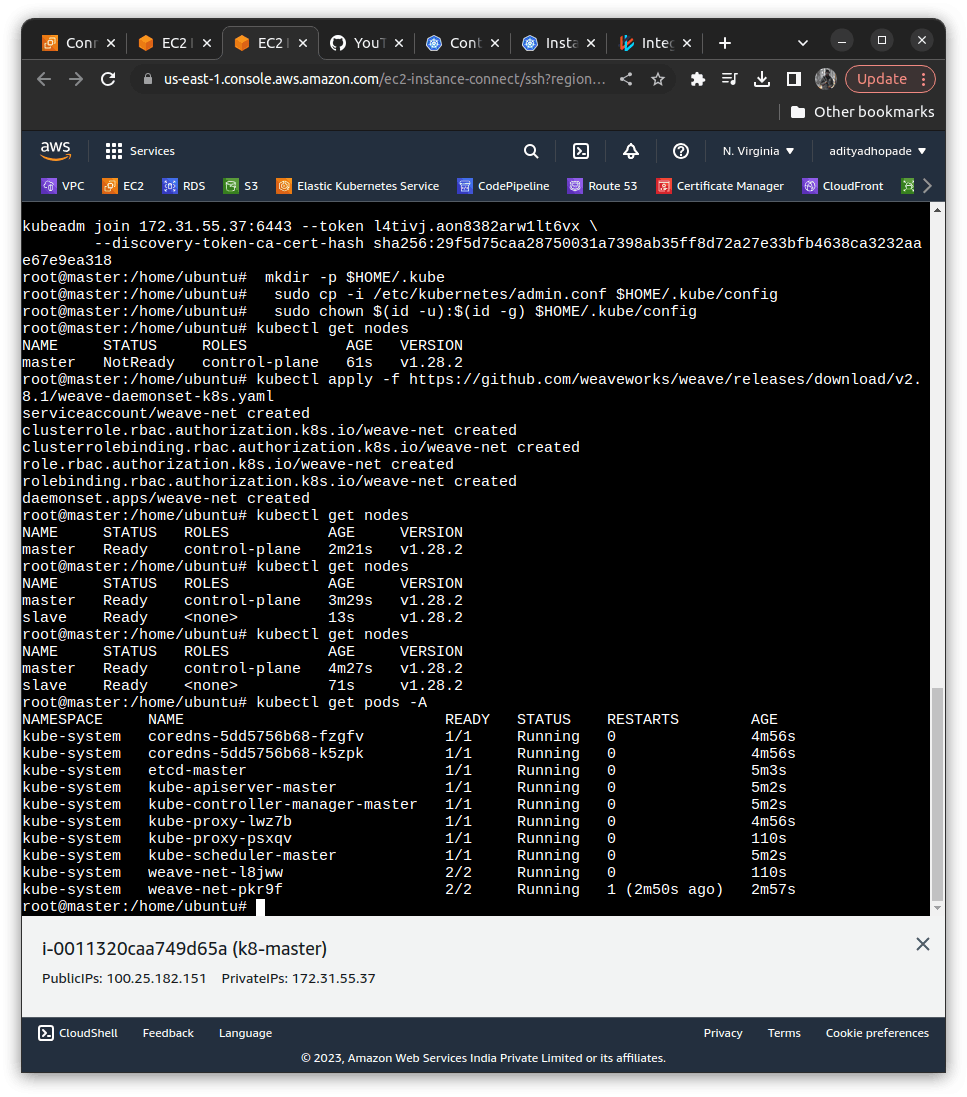
mkdir -p $HOME/.kube
sudo cp -i /etc/kubernetes/admin.conf $HOME/.kube/config
sudo chown $(id -u):$(id -g) $HOME/.kube/config
The token will be used to bind the worker node. We have to paste our token into the Worker Node and also the commands above
We need to install a CNI Plugin as we want to run it; we can use Calico or Weavenet for this; In this example take Weavenet as the CNI PLugin
kubectl apply -f https://github.com/weaveworks/weave/releases/download/v2.8.1/weave-daemonset-k8s.yaml
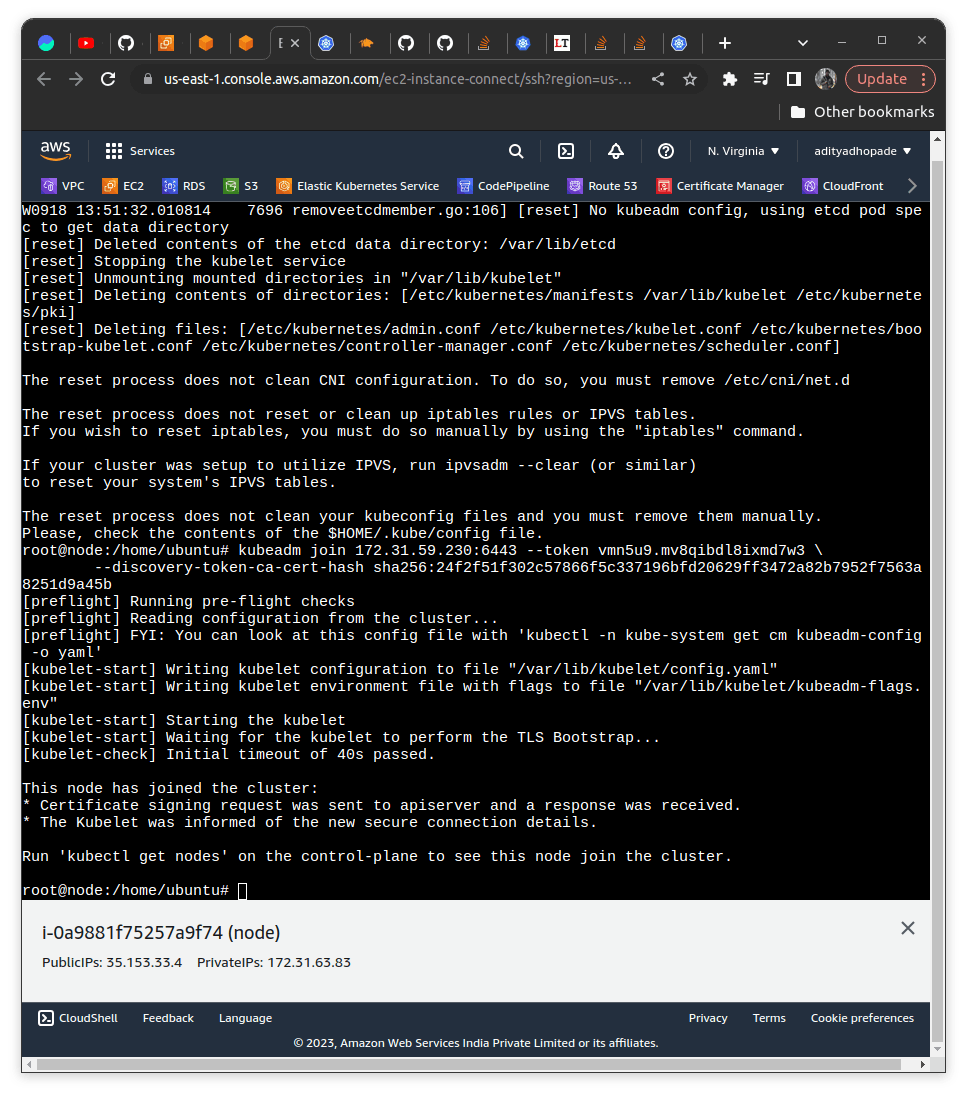
RUN THE COMMAND ON SLAVE NODE
kubeadm join 172.31.59.230:6443 --token 8sujah.ka75hoyjtg22bd3q \
        --discovery-token-ca-cert-hash sha256:3d5397f099b404e42d56872a9e2394fee49b45e12609c1604321e6ef78a7c20f
RUN THE COMMAND to Test the setup now
kubectl get nodes
kubectl get pods -A
I hope you learned something out of this content. If you are getting stuck. I may have left some things unintentionally as this demo stretched for a bit I have attached my repository above try to test it out and configure it yourself you will surely learn something new.
REFER THE FILE IN REPOSITORY: kubeadm_kubectl_kubelet_installation.md